What does a limiter do? Limiter vs compressor, and how to set one on a master
A limiter holds a ceiling the signal cannot cross, and on a master it is also how the track gets louder. Learn how it differs from a compressor, what each control does, and how to set one without losing the drums.
A limiter stops a signal from going above a set level, the ceiling. Whatever comes in, nothing past the ceiling comes out. On a master bus it does two jobs at once: it catches peaks, and, because you push the mix into it with input gain, it is the tool that makes the whole track louder. Both jobs come from the same mechanism, and so do the problems.
What does a limiter do to the signal?
A limiter watches the level and turns the gain down whenever the signal would cross the ceiling, then lets it back up when the peak has passed. Three things decide how that sounds:
- How it sees the peak. Most mastering limiters delay the audio by a few milliseconds, called lookahead, so the gain can start falling before the peak arrives. A true-peak limiter also checks between samples, on an oversampled copy of the signal, so it can hold a ceiling in dBTP.
- How fast the gain falls. The attack. Too fast and the gain change itself becomes audible as a click or distortion; too slow and the peak gets through.
- How fast it recovers. The release. Short release recovers quickly and sounds louder and more active. Long release is smoother but holds the mix down for longer after each peak.
Loudness comes from what happens next. Raise the input by 6 dB and the peaks would rise 6 dB too, except the limiter turns them back down to the ceiling. Everything quieter than the peaks keeps most of that 6 dB. The gap between the peaks and the average level shrinks, and the track measures louder in LUFS while its peaks stay put.
Limiter vs compressor: what is the difference?
Both are gain reduction driven by level. The difference is the job each is set up for.
| Compressor | Limiter | |
|---|---|---|
| Purpose | Shape dynamics: steady a vocal, glue a bus, change the attack of a sound | Hold a maximum level and raise loudness |
| Ratio | Moderate, set by you; level above the threshold still rises, more slowly | Effectively infinite: past the ceiling, more input gives no more output |
| Attack | Often slow enough to let the front of a transient through | Fast, usually with lookahead, so peaks do not pass |
| Level control | Threshold, then makeup gain | Input gain into a fixed ceiling |
| Where it goes | On tracks and buses, anywhere in the chain | Usually last on the master, before dither |
A compressor with a high ratio and a fast attack starts to behave like a limiter, but an ordinary compressor does not promise a ceiling, and it does not check peaks between samples. If the export has to stay under -1 dBTP, use a true-peak limiter at the end of the chain and measure the file. For the compressor side, the dynamic range compression guide covers ratio, knee and timing, and Caliper Compressor offers FET, Opto, Tube and Clean modes for that work.
What do the controls on a mastering limiter do?
- Input gain, or Drive. How hard you push into the limiter. This is the loudness control.
- Ceiling, or output. The highest level allowed out. On a true-peak limiter it is set in dBTP.
- Release. How quickly the gain recovers after a peak. Some limiters adapt it to the material.
- Attack or lookahead. How early the gain starts to fall before a peak. Shorter keeps transients sharper but can distort; longer is cleaner but can soften the front of hits.
- Stereo link. Whether both channels share one gain reduction. Fully linked keeps the stereo image steady; less link lets one side react on its own.
- Dither. Low-level noise for the final reduction to 16 or 24 bit, applied after the limiting. Our dither guide explains when to use it.
How to set a limiter on a master
- Put it last. Anything after the limiter that changes level can push peaks past the ceiling. Dither is the exception.
- Set the ceiling. -1 dBTP is the common starting point. Spotify asks for below -1 dBTP, and below -2 dBTP when the master is louder than -14 LUFS integrated, because lossy encoding adds peaks. The true peak guide explains where those numbers come from.
- Play the loudest section and raise the input.Watch the gain reduction on the biggest hits. Keep going until you hear the first cost: the drums lose their snap, the mix dips on each kick, or the bass starts to buzz. Then back off a little.
- Set the release by ear. Shorten it for more density; lengthen it if the mix pumps or the low end gets rough.
- Compare at matched loudness. The limited version is louder, and louder sounds better at first. Turn it down to the level of the bypassed mix before you decide.
- Measure the export. Read integrated LUFS and true peak on the file you will deliver with the loudness and true-peak meter.
How much gain reduction is right has no single answer. A mix that already sounds finished may need only a little on its loudest hits; a dense club master may take much more, often with a clipper sharing the work. The LUFS targets guide explains why a louder master does not necessarily play louder on streaming services.
Common limiter problems, and what causes them
| What you hear | Usual cause | What to try |
|---|---|---|
| Pumping: the mix dips and swells with the beat | Heavy gain reduction with a short release | Less input, a longer release, or a clipper before the limiter for the drum peaks |
| Soft, dull drums | The gain ducks the whole mix on every hit | Less input, or clip the transients first; check the drum balance in the mix |
| Rough or buzzing low end | The gain moves fast enough to follow bass cycles | A longer release, less input, or a limiter that handles the bass separately |
| Overs on the exported file | A sample-peak limiter, processing after it, or sample rate conversion | Use true-peak mode, keep the limiter last, and measure the file |
| The louder version sounds worse at equal level | Too much limiting for the material | Back off; the loudness was costing more than it gave |
If drum peaks are the problem, the limiter vs clipper guide covers how a clipper in front of the limiter can take them instead.
Where Clearwall fits
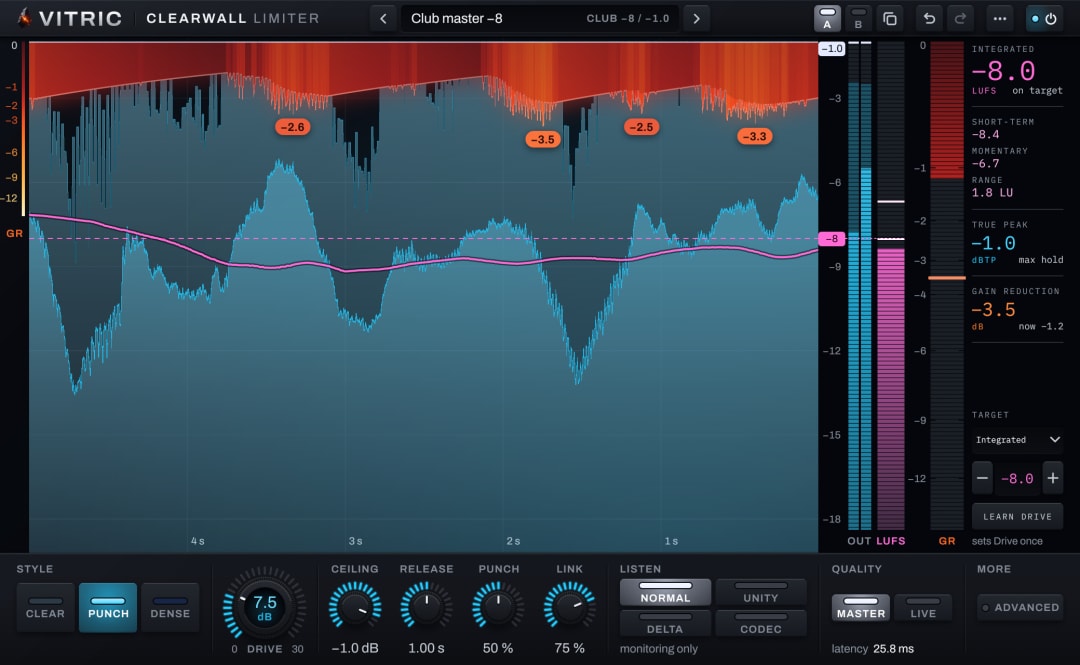
Clearwall Limiter is a true-peak mastering limiter built around the problems above. Its ceiling runs from -12 to 0 dBTP. Drive goes from 0 to 30 dB, Release from 316 ms to 3.16 s, and Attack from 0.1 to 10 ms. Three styles, Clear, Punch and Dense, set how much of the work goes to a clip stage and how much to the gain, and they share one latency. Set a loudness target and Learn Drive measures the loudest part of the song in 4-second windows (8 seconds for a short-term maximum target) and sets Drive once to meet it; it never rides the gain. Unity turns the output down to the input's loudness for a fair comparison, and Delta plays only what the limiter removes. The Clearwall manual covers every control.