Bevel EQ: the manual
The manual for Bevel EQ 1.2.0: installation and license activation, band shapes and slopes, dynamic bands, per-band stereo placement, the analyzer, the keyboard map, and the FAQ. Covers version 1.2.0.
Bevel EQ is a parametric equalizer with 24 freeform band slots. Any slot can be a bell, a low shelf, a high shelf, a notch, a high pass or a low pass, and the high and low pass filters run at slopes from 12 to 96 dB/oct. The EQ opens empty: double-click the curve and the first band exists. A real-time spectrum analyzer draws pre and post at the same time directly under the summed response curve, so the thing you are changing and the thing you are hearing share one display.
This manual covers Bevel EQ 1.2.0: installation, activation, the interface, session workflows and the reference controls. It was updated on 11 September 2026. For more techniques, visit the guides index.
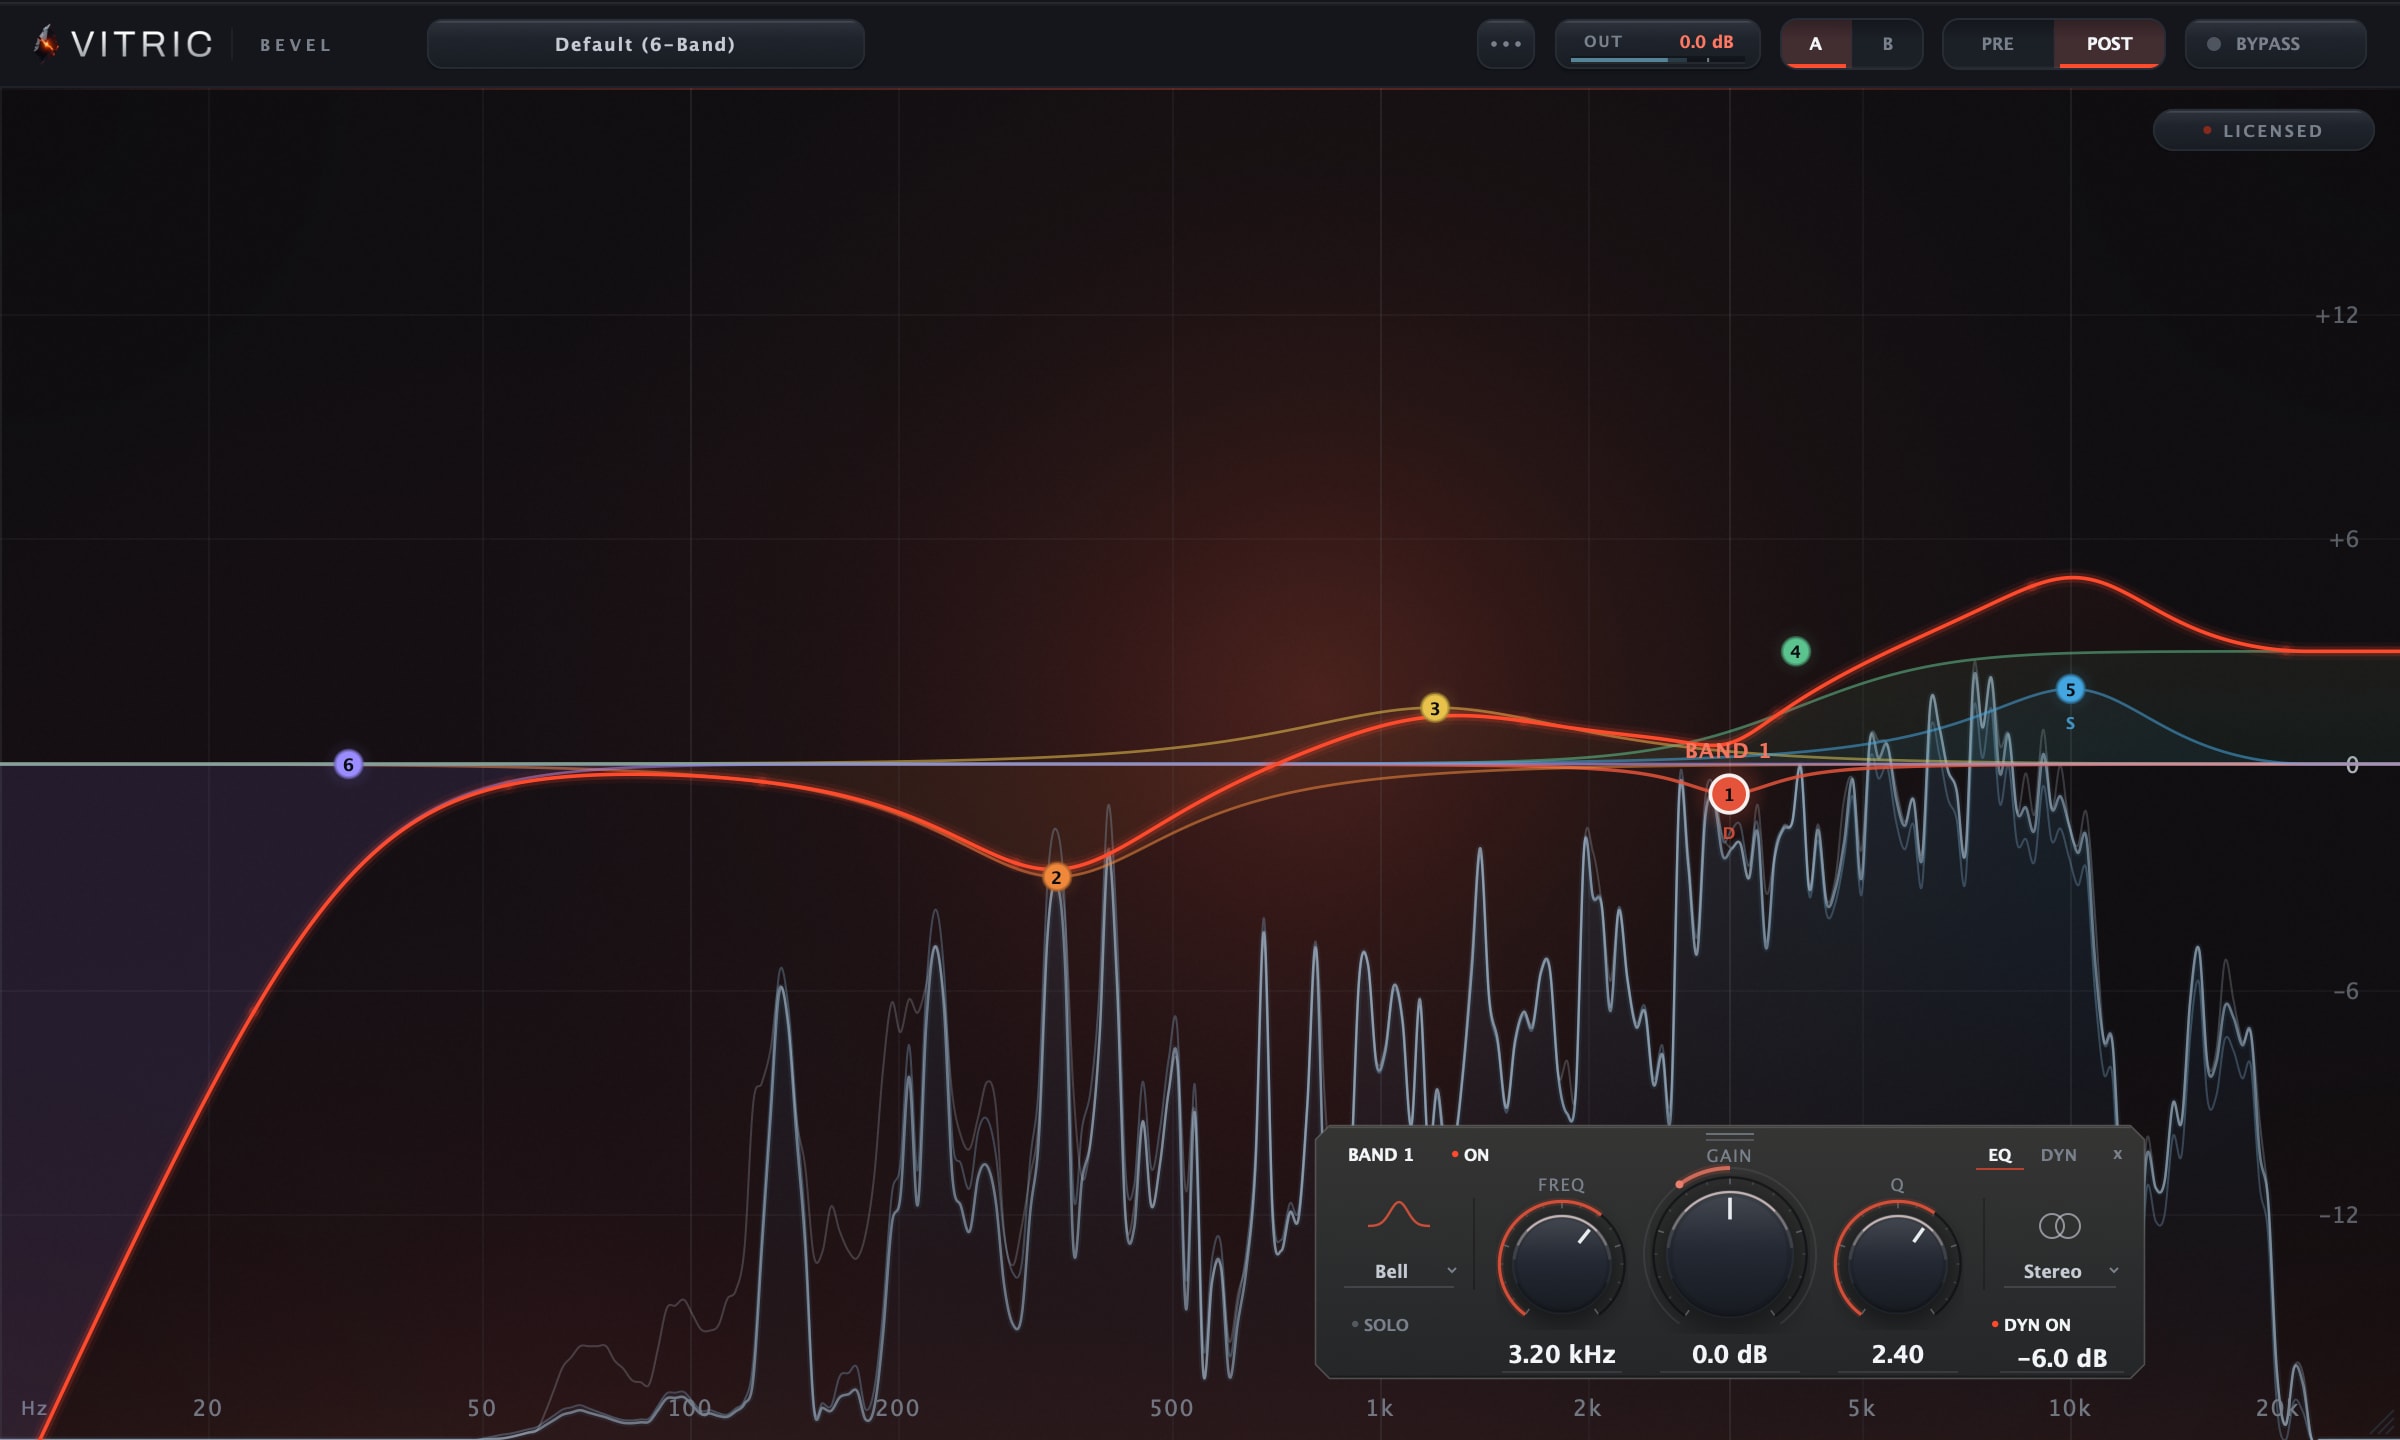
The selected-band plate keeps EQ and dynamics controls close to the graph. Per-band stereo placement, simultaneous pre/post analysis, oversampling, proportional Q, auto-gain and the mono-maker each have their own section below.
Overview
The design premise is simple: the display is the whole interface. The EQ starts with nothing on it. Double-click the curve and a band exists. Nothing is pre-assigned, so a corrective vocal chain and a twelve-notch resonance hunt both fit in one instance. A movable control plate reads the selected band, with exact frequency, gain and Q fields plus shape choices. A and B hold two complete plugin states, so you can switch between two versions of a move. Neither slot adjusts level for you.
A band carries more than a shape. Any band can be placed on the stereo field, as Stereo, Left, Right, Mid or Side, and the gain shapes can be made dynamic, with their own threshold, range, attack and release. A boost in the sides only, or a cut that only lands when the material gets loud, is a band setting rather than a second plugin.
Everything is click-free while audio runs: bypass, band edits and preset recall are all seamless, and every parameter is smoothed for automation. The analyzer is computed and drawn on the interface thread at frame rate; the audio thread only runs the filters, so the spectrum display never costs you audio-path CPU. Plugin state saves and recalls exactly with your session, and the build passes pluginval at strictness level 5.
Installation and activation
Get the current Bevel EQ installer for your computer. Save your session and close your DAW, run the Windows .exe or macOS .pkg, then reopen the DAW. Rescan plugins if necessary.
Insert Bevel EQ on an audio track or bus. Use AU in Logic Pro, AAX in Pro Tools, or VST3 in a compatible host. AU is available on macOS; both platforms include VST3 and AAX.
Windows builds require Windows 10 or later, 64-bit. Mac builds require macOS 10.15 or later on Intel, or macOS 11 or later on Apple Silicon. Your DAW may require a newer operating system.
Start a three-day trial
- Open the plugin’s license panel and choose Start free trial. This opens the trial page for Bevel EQ with your product and machine code filled in.
- Sign in using the link sent to your email. Check the product and machine code, then choose Email my trial.
- Save the attached license file from your email. On the same computer, choose Load file in the plugin’s license panel.
Install first: the three days begin when the trial license is issued. Every feature is available during that window. Keep the computer connected for periodic internet verification. There is one trial per product, person and machine, with no payment details or automatic charge. At expiry, processing locks while the plugin keeps its saved project settings.
Activate a full perpetual license
Paste the VT-... key from your purchase email or account into the license panel and choose Apply license. Full perpetual licenses work offline after activation.
For an offline studio computer, use the license portal on an online device. Enter your key and the studio computer’s VTM1-... machine code, download the bound file, transfer it to the studio computer and choose Load file. The portal can also resend your active full-license keys.
A full license allows three machine bindings over its lifetime. Deactivation does not restore a binding because permanent offline files cannot be remotely erased. Contact support for a legitimate hardware replacement after using the allowance. A trial is bound to its issuing computer.
Find the plugin after installation
Open the plugin from your DAW’s plugin browser. Check that its supported format was installed, restart the DAW, and inspect its rescan or failed-plugin list if the plugin is missing. The Mac package installs plugins, not a standalone application. Windows may also offer a standalone app under C:\Program Files\Vitric Audio.
Standard installation folders
| Format | macOS | Windows |
|---|---|---|
| AU | /Library/Audio/Plug-Ins/Components | Not available |
| VST3 | /Library/Audio/Plug-Ins/VST3 | C:\Program Files\Common Files\VST3 |
| AAX | /Library/Application Support/Avid/Audio/Plug-Ins | C:\Program Files\Common Files\Avid\Audio\Plug-Ins |
If installation or activation still fails, send support the product version, operating system, DAW version, plugin format and exact error.
Interface tour
The display is a full-bleed EQ view: the summed response curve drawn over the live spectrum. The window is freely resizable, from 760 by 420 up to 2400 by 1400, so one instance suits a laptop lid and a large studio display without a fixed set of size presets.
The selected-band control plate
Select a band to open its control plate over the graph. The EQ page contains frequency, gain, Q or slope, shape and stereo placement. The DYN page contains threshold, range, attack and release. DYN ON/OFF separately enables dynamic processing; selecting the DYN page alone does not change the audio. Notch and pass shapes keep their dynamics settings stored while those settings are inactive.
Click a numeric value to type an exact setting. Return applies it, Escape cancels, and Tab moves through the fields. Frequency accepts Hz, kHz and note names such as A4; time values accept milliseconds or seconds. Invalid text leaves the parameter unchanged. On eligible dynamic bands, the inner gain control changes base gain and the outer ring changes range.
Drag the grip or an empty part of the plate to move it clear of your work. Its position stays inside the graph and is remembered. Double-click the grip to restore its automatic position. Use its close button to dismiss it; Escape first cancels an active text draft. New windows start at 1200 by 720, while stored window sizes are retained.
Bands and shapes
Double-click the curve to create a band, then drag its node. There are 24 slots and no fixed layout: each slot can be a bell, a low shelf, a high shelf, a notch, a high pass or a low pass, and the shape can be changed at any time.
- Gain. -30 dB to +30 dB on the shapes that have gain.
- Q. 0.1 to 40, from broad musical curves through to surgical notches.
- Slopes. The high pass and low pass filters offer 12, 24, 48, 72 and 96 dB/oct, built from cascaded Butterworth sections: musical rolloffs at the gentle end, near-brickwall surgery at the steep end.
- Proportional Q. Optional. With it on, a band's bandwidth narrows as the band is pushed harder, so small moves stay broad and large moves tighten up without a second hand on the Q.
Stereo placement, per band
Every band has a placement setting: Stereo, Left, Right, Mid or Side. Stereo processes the whole signal, Left and Right work on one channel, and Mid and Side work on what the two channels share and on what differs between them. A boost in the sides only, or a cut in the mid only, is now one band in one instance rather than a mid/side split rigged up around two.
Dynamic mode, per band
Available on the gain shapes: bell, low shelf and high shelf. Switch a band to dynamic and it stops being a fixed curve. It moves with the material, using four controls of its own.
- Threshold. -72 dB to 0 dB. The level at which the band starts to move.
- Range. -24 dB to +24 dB. How far it moves. The value is signed, so a band can duck or lift.
- Attack. 0.5 to 200 ms. How fast it gets there.
- Release. 5 to 2000 ms. How fast it lets go.
The detector is filtered to the band's own frequency region, so a dynamic band reacts to its own content rather than to overall programme level. A band sitting at 6 kHz moves on sibilance, not on the snare hitting somewhere else in the same mix.
The analyzer
Real-time spectrum, rendered under the summed curve. It shows pre and post at the same time rather than one or the other, so cause and effect share one display: you see the resonance, cut it, and watch the post trace drop away from the pre trace on the same glass. Because it shows what the meter path actually sees, it does not smooth away the narrow resonance you are hunting.
- Range. 60, 90 or 120 dB of vertical span.
- Tilt. 0, 3, 4.5 or 6 dB per octave, for reading a mix against a sloped reference instead of a flat one.
- Speed. Three settings, from quick enough to show a transient to slow enough to read as an average.
- Resolution. Three FFT sizes: 4096, 8192 or 16384 points. The larger sizes resolve low-frequency detail more finely.
- Freeze and peak hold. Freeze holds the current spectrum on screen to work against. A peak-hold trace keeps the highest reading at each frequency.
Per-band solo
Each band can be soloed, and the solo is filtered to match that band's shape, so you hear exactly what the band is working on before you commit to the cut.
Global controls
- Quality. Zero Latency, 2x or 4x. Zero Latency is the default and really is zero latency. The 2x and 4x settings run the processing at a higher internal rate; the resulting latency is reported to the host and the dry path is delay-compensated, so bypass stays phase-aligned with the processed signal.
- Auto-gain. Optional. Compensates the curve's overall boost or cut, so a decision about tone does not turn into a decision about level.
- Mono-maker. Sums to mono below a frequency you choose, anywhere from 20 to 500 Hz, at 24 dB/oct.
- Output trim and metering. A trim on the output, plus output metering: peak and RMS, with peak hold.
Presets, A/B and undo
- Factory presets. Nine of them, as starting points for common session jobs. Preset recall is click-free while audio runs.
- User presets. Save your own to disk and recall them in any session.
- A/B snapshots. Two slots, each holding a complete plugin state, with instant switching between them. The slots recall settings, not loudness, so match levels yourself or use auto-gain if the two versions differ in output. Both slots persist with the session, so the comparison is still there when the project reopens.
- Undo and redo. Inside the plugin, on your band edits.
Mouse and keyboard
The display is built to be driven without leaving it. Hovering shows the frequency and nearest note name. The table below uses Mac modifier names and describes graph gestures. Knobs and value fields use their own host-adapted modifiers; see Options → Shortcuts for those controls, including the Pro Tools-specific fine and reset gestures.
| Input | What it does |
|---|---|
| Double-click the curve | Add a band |
| Delete | Remove the selected band |
| Arrow keys | Nudge frequency and gain |
| Tab / Shift-Tab | Select the next / previous band |
| Cmd-Z / Shift-Cmd-Z | Undo and redo |
| Command-drag a node | Fine movement |
| Shift-drag a node | Change frequency only; lock gain |
| Option/Alt + Shift-drag a node | Change gain only; lock frequency |
| Alt-click a node | Bypass that band |
| Right-click a node | Open that band's context menu |
| Wheel over a node or selected band | Change Q; Command-wheel changes gain; Option/Alt-wheel changes dynamic range when dynamics are on. Shift gives fine increments. |
| Option/Alt-double-click empty graph | Add a dynamic band |
| Hover the display | Frequency readout with the nearest note name |
Workflows
The vocal chain
One instance covers the whole corrective and tonal chain. High-pass the rumble first, using a steeper slope if the fundamental sits close to the junk below it. Then hunt the honk: narrow bell, per-band solo to hear exactly what the band sees, notch it. Finish with a high shelf for air. Store the result in A, try a different balance in B, and switch between them to judge.
Where the problem is intermittent, make the band dynamic instead of cutting for the worst moment. A bell around 6 kHz with a negative range, a fast attack and a short release only moves when the sibilance arrives, and because the detector is filtered to the band's own region, the quiet lines are left alone. The same idea with a wider bell in the low mids handles a singer who only gets boxy when they push.
Resonance hunting
On a ringing snare or a boxy room, watch the analyzer under the curve for the peak that will not die. The hover readout names the frequency and its nearest note, which is often enough to tell a room mode from a drum tuning. Drop a narrow bell on it, solo the band to confirm you have the right frequency, then cut. Because the analyzer draws pre and post together, the confirmation is the gap that opens between the two traces. Freeze earns its place here: hold the offending spectrum on screen and work against it. With 24 slots you can stack as many notches as the source demands without opening a second instance.
Mix bus tone
Bus moves are half-dB decisions, and half-dB decisions need honest comparison. Use broad, gentle shelves, type exact gain values in the floating bar, and lean on the pre and post traces and the A/B snapshots so the judgement is a comparison rather than a guess. For loudness, use auto-gain: it compensates the curve's overall boost or cut, so the louder version does not win by default. Stereo placement is a bus tool too, since a side-only lift in the highs and a mid-only cut in the low mids are different jobs from the same move made across the whole image. If the bus also needs dynamics control, an EQ decision and a compression decision are easier to separate when each tool does one job; see Caliper Compressor for the dynamics half.
Mastering moves
Mastering is where the slope range earns its place: a 96 dB/oct cut can fence off subsonic junk without touching the low end you are keeping, sitting next to wide musical lifts in the same instance. The mono-maker covers the other half of that job, summing everything below a frequency you choose, 20 to 500 Hz at 24 dB/oct, so the bottom stays centred. Move Quality to 2x or 4x when you want the higher internal rate and can spend the reported latency, and leave it on Zero Latency when you cannot. Every change is click-free, so you can audition edits against the running program, and A/B keeps the before and after one switch apart.
Reference
| Band type | What it does | Reach for it on |
|---|---|---|
| Bell | Boost or cut around a centre, Q from broad to surgical | Resonances, presence, body |
| Low shelf | Lift or lower everything below a corner | Warmth, weight, mud |
| High shelf | Lift or lower everything above a corner | Air, brightness, harshness |
| Notch | Remove a single frequency | Hum, whistles, ringing |
| High pass | 12 to 96 dB/oct floor control | Rumble, stage noise, low mud |
| Low pass | 12 to 96 dB/oct ceiling control | Hiss, harsh cymbals, lo-fi moves |
Gain runs -30 dB to +30 dB on the shapes that have gain, and Q runs 0.1 to 40. Dynamic mode is available on the three gain shapes: bell, low shelf and high shelf. Stereo placement is available on all of them.
| Dynamic control | Range | What it sets |
|---|---|---|
| Threshold | -72 dB to 0 dB | The level at which the band starts to move |
| Range | -24 dB to +24 dB | How far it moves. Signed, so the band can duck or lift |
| Attack | 0.5 to 200 ms | How fast it gets there |
| Release | 5 to 2000 ms | How fast it lets go |
| Spec | Value |
|---|---|
| Bands | 24 freeform slots, empty at load |
| Shapes | Bell, low shelf, high shelf, notch, high pass or low pass, on any slot |
| Gain and Q | -30 dB to +30 dB, Q 0.1 to 40 |
| Filter slopes | 12, 24, 48, 72, 96 dB/oct, cascaded Butterworth sections |
| Stereo placement | Stereo, Left, Right, Mid or Side, per band |
| Dynamic mode | Per band on the gain shapes, with a detector filtered to the band's own frequency region |
| Quality | Zero Latency (default), 2x or 4x, latency reported to the host, dry path delay-compensated |
| Analyzer | Pre and post at once; 60/90/120 dB range; 0/3/4.5/6 dB per octave tilt; three speeds; 4096/8192/16384-point FFT; freeze; peak hold |
| Curve options | Proportional Q, auto-gain |
| Mono-maker | 20 to 500 Hz, 24 dB/oct |
| Output | Trim, plus peak and RMS metering with peak hold |
| Presets | 9 factory presets, plus user presets saved to disk |
| Sessions | A/B snapshots that persist, in-plugin undo and redo |
| Window | Freely resizable, 760x420 to 2400x1400 |
| Validation | Passes pluginval at strictness level 5 |
| Formats | VST3, AU, AAX |
| Platforms | Windows 10+ (64-bit); macOS 10.15+ Intel / 11+ Apple Silicon |
| Activations | 3 lifetime machine bindings per purchased perpetual license |
What it does not do
The following limits apply to this version:
- One phase mode. There is no linear phase option and no natural-phase style mode.
- Stereo only. No surround and no Dolby Atmos.
- No EQ match. There is no curve matching, and no spectrum-grab or draw-a-curve feature.
- No collision or masking view. Instances do not talk to each other or show where two tracks fight.
- One band at a time. There is no multi-band selection and no group editing.
FAQ
Does it add latency? Not on the default Quality setting. Zero Latency really is zero latency. Choose 2x or 4x and the oversampling latency is reported to the host, with the dry path delay-compensated so bypass stays phase-aligned.
Is there a linear phase mode? No. Bevel EQ has one phase mode. There is no linear phase and no natural-phase style option.
Can a band work on the sides only? Yes. Every band has a placement setting: Stereo, Left, Right, Mid or Side. A boost in the sides only and a cut in the mid only are both single-band moves.
Does a dynamic band react to the whole mix? No. The detector is filtered to the band's own frequency region, so the band moves on its own content rather than on overall programme level.
Can I use it on surround or Atmos? No. Bevel EQ is stereo only.
Does it do EQ match? No. There is no curve matching, no spectrum-grab or draw-a-curve feature, and no masking view between instances.
Can I move several bands at once? No. There is no multi-band selection or group editing; bands are edited one at a time.
Where do my own presets live? User presets save to disk alongside the nine factory presets, and recall in any session. A/B snapshots are separate: they hold two complete plugin states and persist with the session rather than with the preset folder.
Does the analyzer cost CPU in the audio path? No. The spectrum is computed and drawn on the interface thread at frame rate. The audio thread only runs the filters.
Can I automate bands without zipper noise? Yes. Every parameter is smoothed, and bypass, band changes and preset recall are click-free while audio runs.
What DAWs does it support? Use AU on macOS, VST3 in a compatible 64-bit host, or AAX in Pro Tools. Your DAW may require a newer OS than the plugin build minimum. Check the DAW's system requirements and supported plugin formats.
Can I try it before buying? Yes. Install the plugin, then choose Start free trial in its license panel or visit the trial page. The full-function trial lasts three days from license issuance and needs internet access for periodic verification. It is limited to one per product, per person and machine, with no automatic charge.
What happens if I use all 3 machine bindings? A permanent offline license cannot be remotely erased, so deactivation does not create a fourth binding. Write to support if you replaced hardware and we will review the legitimate move.
Support
Questions, activation trouble, or anything this manual does not cover: support@vitricaudio.com. Every purchase also carries a 14 day money back guarantee, no questions asked, so the real test is always your own sessions.