Clearwall Limiter: the manual
Learn Clearwall installation, the Clear, Punch and Dense styles, every control, the meters, Unity and Delta listening, Codec margin, Target and Learn Drive, dither, Master and Live, and the presets.
Clearwall Limiter is a mastering limiter. It holds a true-peak ceiling while keeping your bass, your punch and your top end clean, from gentle streaming masters to loud club and trap masters. It goes last on your master bus.
This guide covers Clearwall Limiter 1.0.
Installation and activation
Get the current Clearwall Limiter installer for your computer. Save your session and close your DAW, run the Windows .exe or macOS .pkg, then reopen the DAW. Rescan plugins if necessary.
Insert Clearwall Limiter on an audio track or bus. Use AU in Logic Pro, AAX in Pro Tools, or VST3 in a compatible host. AU is available on macOS; both platforms include VST3 and AAX.
Windows builds require Windows 10 or later, 64-bit. Mac builds require macOS 10.15 or later on Intel, or macOS 11 or later on Apple Silicon. Your DAW may require a newer operating system.
Start a three-day trial
- Open the plugin’s license panel and choose Start free trial. This opens the trial page for Clearwall Limiter with your product and machine code filled in.
- Sign in using the link sent to your email. Check the product and machine code, then choose Email my trial.
- Save the attached license file from your email. On the same computer, choose Load file in the plugin’s license panel.
Install first: the three days begin when the trial license is issued. Every feature is available during that window. Keep the computer connected for periodic internet verification. There is one trial per product, person and machine, with no payment details or automatic charge. At expiry, processing locks while the plugin keeps its saved project settings.
Activate a full perpetual license
Paste the VT-... key from your purchase email or account into the license panel and choose Apply license. Full perpetual licenses work offline after activation.
For an offline studio computer, use the license portal on an online device. Enter your key and the studio computer’s VTM1-... machine code, download the bound file, transfer it to the studio computer and choose Load file. The portal can also resend your active full-license keys.
A full license runs on up to three computers at a time. Deactivating does not open a slot on its own, because permanent offline files cannot be remotely erased, so when you replace a computer, contact support and we move the license to the new one for free. A trial is bound to its issuing computer.
Find the plugin after installation
Open the plugin from your DAW’s plugin browser. Check that its supported format was installed, restart the DAW, and inspect its rescan or failed-plugin list if the plugin is missing. The Mac package installs plugins, not a standalone application. Windows may also offer a standalone app under C:\Program Files\Vitric Audio.
Standard installation folders
| Format | macOS | Windows |
|---|---|---|
| AU | /Library/Audio/Plug-Ins/Components | Not available |
| VST3 | /Library/Audio/Plug-Ins/VST3 | C:\Program Files\Common Files\VST3 |
| AAX | /Library/Application Support/Avid/Audio/Plug-Ins | C:\Program Files\Common Files\Avid\Audio\Plug-Ins |
If installation or activation still fails, send support the product version, operating system, DAW version, plugin format and exact error.
Quick start
- Put Clearwall last on the master bus.
- Pick a style: Clear for transparent masters, Punch for most modern music, Dense for the loudest masters.
- Set the Ceiling. -1.0 dBTP is a safe default for streaming.
- Raise Drive until the loudness reads where you want it. Or set a Target and press Learn Drive while the loudest part of the song plays.
- Listen with Unity to compare at matched loudness, and with Delta to hear what the limiter removes.
The styles
- Clear. The style behind the Streaming -14, Acoustic -12, Lo-fi -11 and Transparent -10 presets. It clips only the tips of hits, well above the ceiling, and leaves the rest to a smooth gain. The most transparent.
- Punch. The house voice, for masters at about -9 to -7 LUFS. Drum hits keep their snap: their first milliseconds are clipped instead of ducked. The hit clip never takes a held note, so sustained synths stay clean, and the bass has its own clip, set higher and backing off as you push.
- Dense. For the loudest masters, about -7 to -5 LUFS. Once its steady gain reduction passes 3 dB, it hands more of the work to the clipper and keeps that extra clipping off the bass.
All three styles have the same latency, so switching never shifts your timing.
The controls
The strip along the bottom holds Style, Drive, Ceiling, Release, Punch, Link, Listen and Quality. Attack, Curve, Contain, Codec margin and Dither are in the Advanced panel: the ADVANCED key, under More.
| Control | Range | What it changes |
|---|---|---|
| Drive | 0 to 30 dB | How hard you push into the limiter. |
| Ceiling | -12 to 0 dBTP | The highest true peak the output may reach. The ceiling is held on the true (inter-sample) peak. |
| Release | 316 ms to 3.16 s; 1 s at the middle | How fast the steady gain reduction recovers. Longer is smoother; shorter is louder and more active. |
| Attack (Advanced) | 0.1 to 10 ms; 0.3 ms default | How early the fast stage starts to turn down before a peak. The default keeps transients sharp. In Live it stops at 1 ms. |
| Punch | 2 dB either side of the style's value | Moves the hit-clipping threshold. Up for more snap and loudness, down for a cleaner, rounder sound. |
| Link | 0 to 100% | How much the two channels share their fast gain reduction. 100% keeps the stereo image steadiest; lower values let each side react on its own. |
| Curve (Advanced) | Converter (default) or Smooth | The clip shape. Converter is the hard knee Clearwall is tuned on; Smooth is a softer knee. |
| Contain (Advanced) | On (default) or off | A gentle band-limit at about 20 kHz before the final true-peak stage, so the ceiling also holds through real converters. Leave it on unless you need the extreme top untouched. |
The display
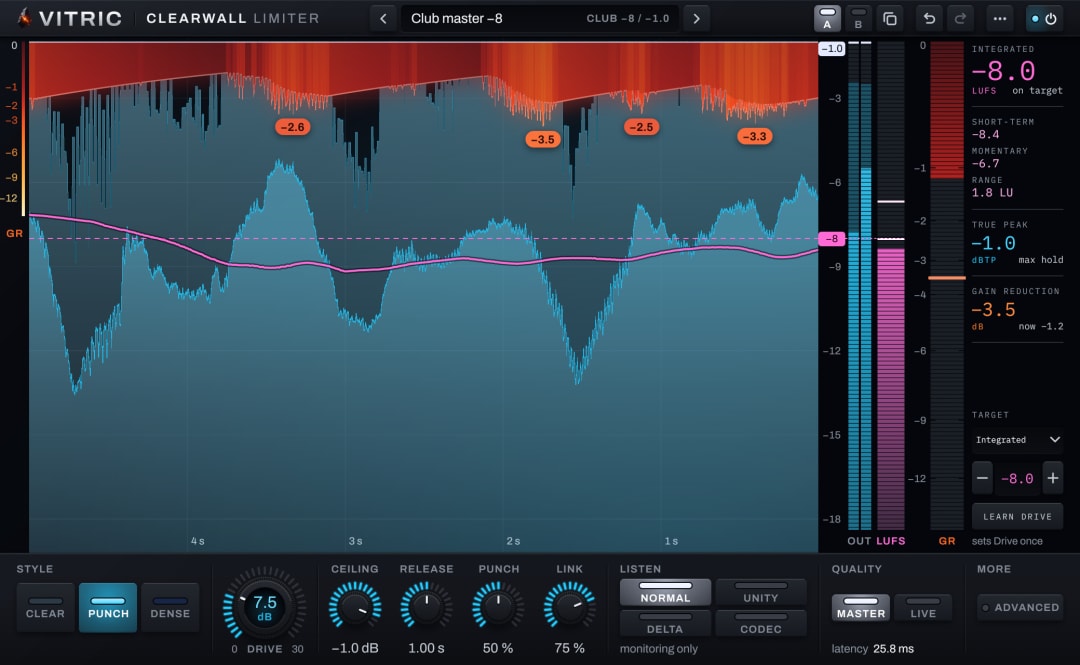
The analyzer scrolls right to left over the last five seconds.
- Input is drawn as a quiet shape. Output is the clear light in front, with a crisp edge.
- Gain reduction hangs from the top as an orange curtain, as deep as the dB the limiter took. The deepest events carry their number.
- The ceiling line at the top shows the ceiling being held. With the codec margin acting, it shows the lower codec ceiling and says so.
- The loudness line (pink) is the short-term loudness. The dashed line is your target.
- OUT, LUFS and GR at the right: the output level; the loudness meter (the short-term fill, a tick for momentary, marks for the integrated value and the target); and the gain-reduction meter with its peak held.
The meters
Integrated, short-term and momentary loudness (LUFS), true peak (dBTP) and loudness range (LU), all measured on the output to ITU-R BS.1770 and EBU Tech 3341 and 3342. Under the integrated value, Clearwall says how far you are from the target (“on target”, “0.2 under”). The true peak holds its maximum, and the gain reduction shows its peak and the reduction now. To start the loudness readings again, choose Reset the loudness meter in the Options menu.
Listening
Listen modes are for monitoring. An offline bounce always prints the normal output; a real-time bounce or recording captures what you hear.
- Normal. The limited output.
- Unity. The output turned down to the input's loudness, so you can judge the sound without the “louder is better” trap.
- Delta. What the limiter removes. Silence here means it is taking nothing.
- Codec. The output through an AAC 256 kbps encode and decode, heard 0.15 to 0.2 seconds late, so you can hear what streaming does to your master. macOS only: on Windows the key shows “codec unavailable” and is silent.
Clearwall opens in Normal every time, even if the session was saved in another listen mode.
Codec margin
Lossy codecs (AAC, MP3, Opus, Vorbis) add peaks when they decode a loud master.
- What it does: when on, Clearwall holds the ceiling 1 dB lower while your master is louder than -14 LUFS (fading in from -16 LUFS). The readout shows the lower ceiling whenever it is acting. Quiet material keeps your ceiling.
- What it does not do: it does not make every codec safe. Measured at -8 LUFS, decoded peaks land around your ceiling on AAC 256 and MP3 320, and much nearer it, but not always under it, on low-bitrate codecs.
- The cost: 1 dB less headroom at the same loudness means 1 dB more limiting. That is why it is off by default. Try it for streaming releases, and use Codec listen to hear the difference.
Target and Learn Drive
- Target sets the loudness you are aiming for: integrated LUFS, short-term maximum, or PLR (or Off). Set the value with - and + (hold Shift for 0.1 steps) or type it. The display draws it as a dashed line.
- Learn Drive listens to the loudest part of your song in 4-second windows and sets Drive to reach the target. If the target is out of reach, it keeps the closest Drive it measured and says so. Loop the loudest section, press Learn Drive, and fine-tune by ear.
- Learn Drive sets Drive once; it does not ride the gain.
Dither
In the Advanced panel: Off, 24-bit or 16-bit. Noise shaping is available at 16 bit, at 44.1 and 48 kHz. Dither comes after the limiter, and the ceiling still holds after it. Use it only on the final export to that bit depth.
Quality: Master and Live
- Master (default) is the full Clearwall, with a fixed latency of 25.8 ms at 48 kHz. Your host compensates for it.
- Live cuts the latency to 8.5 ms at 48 kHz, for playing or recording through the master bus. It leaves out the bass band path and the 20 kHz containment. It sounds very close to Master, and the ceiling still holds: Live keeps the true peak 0.05 dB under your ceiling, so -1.0 reads -1.1. Switch back to Master for the final bounce.
The latency readout under the Quality keys shows the current latency at your sample rate.
Presets
Browse them with the arrows either side of the preset name, or click the name for the list. Each preset sets the style, the character controls, the ceiling (-1.0 dBTP) and a loudness target. It never moves Drive, so loading one never jumps your level. Use Learn Drive, or raise Drive to the target.
A target can only be reached if your mix is quieter than it before Clearwall. Drive cannot turn a mix down.
| Preset | Style | Target |
|---|---|---|
| Club master -8 (default) | Punch | -8 LUFS |
| Trap master -7 | Punch | -7 |
| Trap master -6 | Dense | -6 |
| Hip-hop master -8 | Punch | -8 |
| Boom bap master -9 | Punch | -9 |
| R&B master -9 | Punch | -9 |
| Pop master -8 | Punch | -8 |
| EDM master -6 | Dense | -6 |
| EDM master -5 | Dense | -5 |
| Rock master -8 | Punch | -8 |
| Transparent master -10 | Clear | -10 |
| Lo-fi master -11 | Clear | -11 |
| Acoustic master -12 | Clear | -12 |
| Streaming master -14 | Clear | -14 |
| Spoken word -16 | Clear | -16 |
The header
- A and B hold two complete settings. Click the other slot to compare; its first visit starts as a copy of the one you are on. Copy copies these settings into the other slot.
- Undo and redo (Cmd-Z and Shift-Cmd-Z on macOS, Ctrl-Z and Ctrl-Y on Windows) step through your changes, including preset loads and A/B recalls.
- Options (the three dots): the window size (75 to 160%), Reset the loudness meter, Reduce visual effects (30 fps), Licence..., and the version.
- Bypass (the power key) is the same switch as your host's bypass. Bypassed, Clearwall plays the input delayed by its latency, so your timing never jumps, with a 10 ms crossfade, and the meters keep reading.
Working the controls
- Drag a knob to adjust; Shift-drag for fine control; the mouse wheel steps.
- Double-click a knob, or Cmd/Ctrl-click it, to reset it to its default.
- Click a value under a knob to type an exact number.
- In Pro Tools, fine control is Cmd/Ctrl-drag and reset is Alt-click.
Without a license
Clearwall needs a license or a trial to make sound. Without one it is silent, shows LOCKED over the analyzer, and opens the license card each time its window opens. Saved sessions still reopen with their settings. The card is also in Options, Licence....
- Start free trial opens vitricaudio.com in your browser for a 3-day trial on this computer. The trial checks in with vitricaudio.com every few minutes, so keep the computer online.
- Apply license or Load file installs a purchased license. It works offline once installed.
- This machine shows the code a license is issued for. Copy code puts it on the clipboard.
Clearwall shows no license status on its face. The trial's days left and the in-plugin update notice are in Options, Licence....
Tips
- Bass-heavy music (trap, 808s): Punch at -8 to -7, or Dense at -6 to -5. Clearwall keeps the bass in the steady gain rather than clipping it, so the low end holds its weight.
- Harsh or crackly at high drive? Lower Punch a little, or step from Dense to Punch.
- The stereo image wanders on wide mixes? Raise Link toward 100%.
- Judge at matched loudness. Use Unity before deciding that a louder setting sounds better.
Specifications
- Latency, fixed per mode and reported to your host: Master 25.8 ms and Live 8.5 ms at 48 kHz; at 44.1 kHz 26.9 and 9.0 ms; at 96 kHz 22.4 and 5.9 ms; at 192 kHz 21.1 and 4.6 ms.
- Tail: one latency, reported to your host. Let your host render effect tails on export, so a song that ends abruptly still holds the ceiling on its last samples.
- Sample rates: 44.1 to 192 kHz, with the same sound at every rate.
- True peak: reference detector with 8x oversampling and parabolic refinement, verified per sample.
- Loudness metering: ITU-R BS.1770, EBU Tech 3341 and 3342.
- Formats: macOS (Apple silicon and Intel): AU, VST3 and AAX. Windows 10 or later, 64-bit: VST3, AAX and a standalone app.
Credits
Interface type: Archivo, copyright 2020 The Archivo Project Authors, in two static cuts with tabular figures; and IBM Plex Mono, copyright 2017 IBM Corp., with Reserved Font Name "Plex". Both are used under the SIL Open Font License, Version 1.1. The full license texts for these fonts and for the other third-party software in Clearwall are on the open source notices page, and the installer carries the same text.