Caliper Compressor: the manual
Installation, activation, the four circuit modes, sidechain routing and session recipes for Caliper Compressor. Covers version 1.1.
Caliper Compressor is a character compressor with four separate circuit behaviours in one unit: FET, Opto, Tube and Clean. They are not presets on a shared engine. Each mode has its own detection, ballistics and saturation, built against the 1176, LA-2A and CL 1B workflows plus a transparent modern design. Switch modes and the whole machine re-lights.
This manual covers Caliper Compressor 1.1: installation, activation, the interface, session workflows and the reference controls. It was updated on 1 October 2026. For more techniques, visit the guides index.
Overview
Every mode runs at zero samples of added latency, so Caliper sits anywhere: tracking chains, the mix bus, mastering. All four modes share a full sidechain kit (external input, high-pass filter, listen mode), a stereo link control from 0 to 100 percent with the detector following the louder channel, a mix control for parallel compression on the unit, and a click-free bypass crossfade. Attack and release read out in real milliseconds and microseconds per mode. Factory presets, presets you save yourself, full state recall and total automation are supported.
Formats are AU on macOS, and VST3 and AAX on Windows and macOS. Use a compatible 64-bit host and check its system requirements; sidechain routing depends on the DAW and plugin format.
Installation and activation
Get the current Caliper Compressor installer for your computer. Save your session and close your DAW, run the Windows .exe or macOS .pkg, then reopen the DAW. Rescan plugins if necessary.
Insert Caliper Compressor on an audio track or bus. Use AU in Logic Pro, AAX in Pro Tools, or VST3 in a compatible host. AU is available on macOS; both platforms include VST3 and AAX.
Windows builds require Windows 10 or later, 64-bit. Mac builds require macOS 10.15 or later on Intel, or macOS 11 or later on Apple Silicon. Your DAW may require a newer operating system.
Start a three-day trial
- Open the plugin’s license panel and choose Start free trial. This opens the trial page for Caliper Compressor with your product and machine code filled in.
- Sign in using the link sent to your email. Check the product and machine code, then choose Email my trial.
- Save the attached license file from your email. On the same computer, choose Load file in the plugin’s license panel.
Install first: the three days begin when the trial license is issued. Every feature is available during that window. Keep the computer connected for periodic internet verification. There is one trial per product, person and machine, with no payment details or automatic charge. At expiry, processing locks while the plugin keeps its saved project settings.
Activate a full perpetual license
Paste the VT-... key from your purchase email or account into the license panel and choose Apply license. Full perpetual licenses work offline after activation.
For an offline studio computer, use the license portal on an online device. Enter your key and the studio computer’s VTM1-... machine code, download the bound file, transfer it to the studio computer and choose Load file. The portal can also resend your active full-license keys.
A full license runs on up to three computers at a time. Deactivating does not open a slot on its own, because permanent offline files cannot be remotely erased, so when you replace a computer, contact support and we move the license to the new one for free. A trial is bound to its issuing computer.
Find the plugin after installation
Open the plugin from your DAW’s plugin browser. Check that its supported format was installed, restart the DAW, and inspect its rescan or failed-plugin list if the plugin is missing. The Mac package installs plugins, not a standalone application. Windows may also offer a standalone app under C:\Program Files\Vitric Audio.
Standard installation folders
| Format | macOS | Windows |
|---|---|---|
| AU | /Library/Audio/Plug-Ins/Components | Not available |
| VST3 | /Library/Audio/Plug-Ins/VST3 | C:\Program Files\Common Files\VST3 |
| AAX | /Library/Application Support/Avid/Audio/Plug-Ins | C:\Program Files\Common Files\Avid\Audio\Plug-Ins |
If installation or activation still fails, send support the product version, operating system, DAW version, plugin format and exact error.
Interface tour
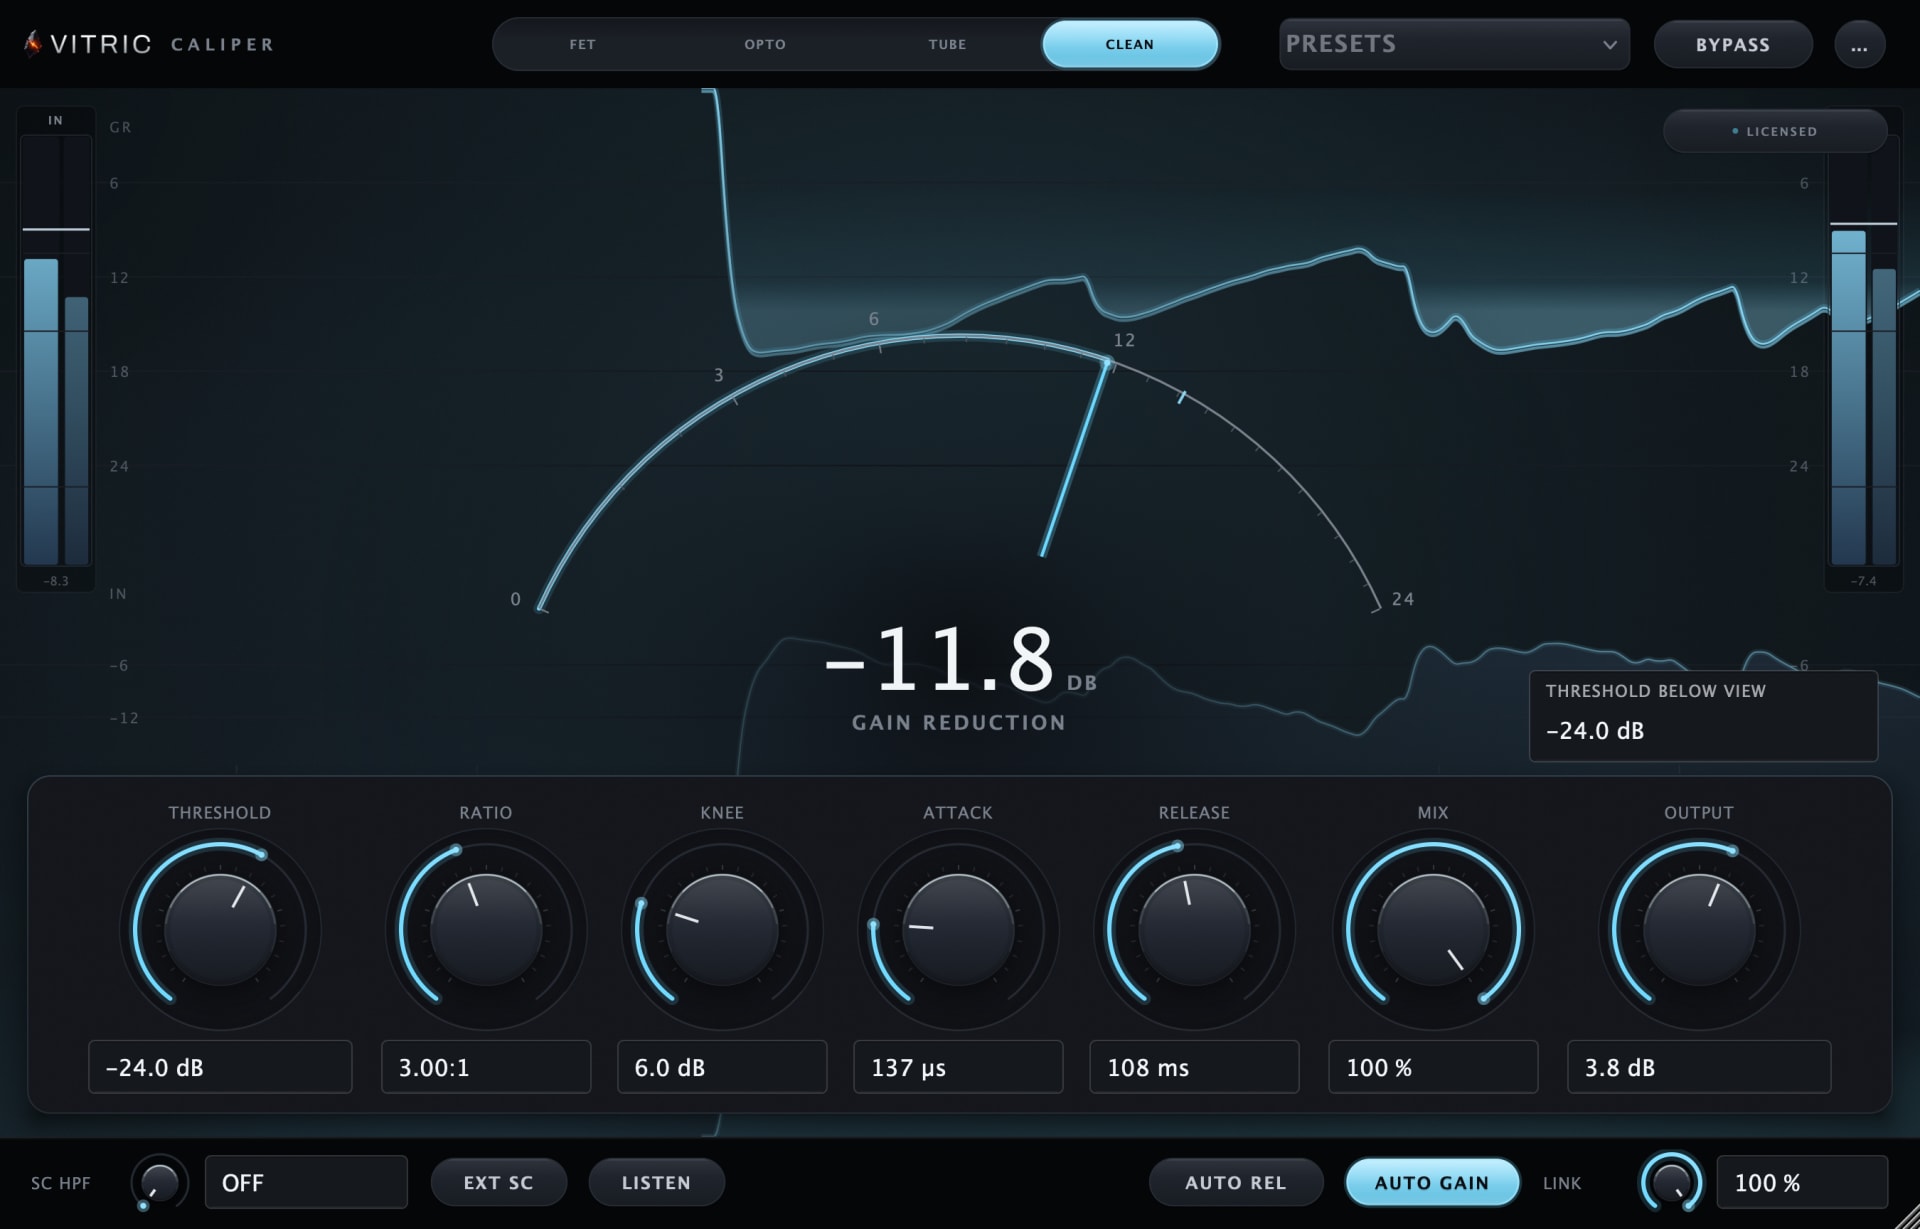
The unit is organized around the mode switch and a black glass gain reduction display. Selecting a mode changes the light, the available controls and the machine's behaviour.
- FET. The 1176 move. Attack reaches into the microseconds, the threshold is fixed and the input level drives the compression, and ratio is set with buttons from 4:1 to 20:1 plus ALL for the all-buttons-in sound. Detection is feedback style, reading the already-compressed signal, with program-dependent release. Asymmetric grit scales with how hard you drive it.
- Opto. An LA-2A style cell with two-stage release and light memory: the harder it works, the slower it lets go. Peak reduction drives the detector only, not the audio level, so the gain rides feel played rather than processed. Second-harmonic warmth rounds the top.
- Tube. A CL 1B style wide soft knee that compresses long before the needle admits it, with biased-tanh harmonics and auto makeup gain. Its ratio runs from 1.5 to 10:1.
- Clean. Feedforward detection with exact knee math, auto release, auto makeup and zero added colour. Textbook dynamics with nothing on top.
- Sidechain section. Switch between the internal detector and an external sidechain input, filter the detector with the sidechain high-pass, and use listen mode to hear exactly what the detector hears. External routing depends on the DAW and plugin format.
- Stereo link. Continuous from 0 to 100 percent. Linked detection follows the louder channel, so a hit on one side pulls both channels together instead of lurching the image.
- Mix. Wet/dry blend for parallel compression without a duplicate bus. Safe to automate, like every other control.
- Bypass. A click-free crossfade, so A/B decisions are about the compression, not the pop.
Exact values and timing
MIX and OUTPUT stay in the same place when you change circuit. Click a value beneath a control to type it exactly, then Return applies and Escape cancels. Attack and release use the circuit's physical time range: enter us, ms or s; bare numbers mean milliseconds. A mode change closes unfinished entry. Host automation may display the stored normalized time parameter rather than the physical time readout.
| Mode | Manual attack | Manual release |
|---|---|---|
| FET | 20–800 µs | 50 ms–1.1 s |
| FET with ALL | 14–560 µs | 30–660 ms |
| Opto | Fixed; manual control hidden | Two-stage; manual control hidden |
| Tube | 0.5–300 ms | 5 ms–10 s |
| Clean | 0.02–300 ms | 5 ms–4 s, or AUTO |
ALL runs FET's attack at 0.7x and its release at 0.6x. The readouts and typed entry follow, so the time shown is the time that runs.
Clean's AUTO release retains the manual value while using automatic release behavior. Turn AUTO off to return to that value. The sidechain high-pass reads OFF at its minimum; 22 Hz is the first active value. Type OFF to bypass the filter.
Saving and recalling your own presets
- Set Caliper the way you want it, open PRESETS and choose Save preset..., then type a name.
- Your presets appear under User in the same menu, after the factory presets. Choose one to recall it.
- Rename preset and Delete preset manage the list, and Show preset folder opens the folder the files are saved in.
A saved preset holds every control except bypass and is available in any project. The files live in ~/Library/Application Support/Vitric Audio/Presets/Caliper Compressor on macOS and %APPDATA%\Vitric Audio\Presets\Caliper Compressor on Windows. Saving and loading your own presets needs an unlocked plugin (a purchase or an active trial).
Workflows
Drum bus
FET at 4:1 with the attack backed off. The microsecond-capable attack stage, deliberately slowed, lets the transient through and then grabs the room behind it. For parallel crush, push into ALL and dial the result in on the mix knob instead of a parallel bus: full crush at the detector, proportion under one finger.
Lead vocal
Opto. The cell rides a vocal the way the classic does: fast enough to catch, slow enough to breathe, and because of the light memory it releases slower the harder the phrase pushes. Loud sections settle instead of pumping back up. If low-end plosives are driving the detector, raise the sidechain high-pass and confirm with listen mode.
Mix bus glue
Tube, aiming for 1 to 3 dB of gain reduction. The wide soft knee starts working before you can hear it working, so the record holds hands without pumping. Auto makeup keeps the level honest while you find the depth, which matters: louder always votes for itself in an A/B.
Mastering lid
Clean. Exact knee math and auto release keep a master controlled without leaving a fingerprint, and zero added latency means it sits anywhere in the chain. If the master needs tonal work rather than a lid, do that upstream with an EQ such as Bevel EQ and let Clean stay a pure dynamics stage.
Reference: which light to reach for
| Mode | Character | Detection | Reach for it on |
|---|---|---|---|
| FET | Fast, aggressive, gritty | Feedback, program-dependent release | Drum bus, parallel crush, bass |
| Opto | Slow, smooth, musical | Feedback, two-stage release with memory | Lead vocals, bass guitar, levelling |
| Tube | Warm, rounded, forgiving | Feedback, wide soft knee | Mix bus glue, keys, full mixes |
| Clean | Transparent, exact | Feedforward, exact knee math | Mastering, anything that must stay pure |
Colour follows the same split. Per-mode saturation sits after gain reduction: FET grit grows with drive, Tube and Opto add second-harmonic warmth, Clean adds nothing.
FAQ
Is the FET mode like an 1176?
It is built against that workflow: attack into the microseconds, a fixed threshold with the input driving the compression, ratio buttons, and an ALL mode for the all-buttons-in sound. Detection is feedback style with program-dependent release, which is where the hardware's character comes from.
What is the difference between the four modes?
They are four separate circuit behaviours, not one engine with presets. FET is fast and gritty, Opto rides slowly with release memory, Tube glues through a wide knee with warmth, and Clean is a transparent feedforward design. Each mode has its own detection, ballistics and saturation.
Does it add latency?
No. Every mode runs at zero samples of added latency, so it works anywhere: tracking chains, mix bus, mastering.
Can I sidechain it from another track?
Yes. Route a source to Caliper's external sidechain in your DAW, select the external detector and use Listen to confirm the signal. The sidechain high-pass filters only the detector. Routing steps and availability depend on the DAW and plugin format.
What happens when my trial ends?
Processing locks, but nothing is deleted and sessions that use it still open. Activating a purchased license or valid subscription picks up exactly where you left off.
Support
Questions, activation trouble, or a bound machine you can no longer access: write to support@vitricaudio.com. Purchases carry a 14 day money back guarantee, so if Caliper does not earn its insert in your sessions, say so and we refund it.