Burnish Vocal Chain: the manual
Install and activate Burnish 1.1.0, build a vocal chain with its eight stations, import a reference and work with macros, exact values and presets.
Burnish Vocal Chain puts input cleanup, pitch correction, EQ, compression, color, doubling, space and level control in one plugin. Use PLAY for six broad adjustments, then open DESIGN to work on individual processors.
This guide covers version 1.1.0. Burnish accepts mono or stereo input and produces stereo output. Its pitch correction is intended for a single vocal line; put separate instances on separate singers when each needs its own tuning.
Get a vocal working in a minute
- Install Burnish from Downloads, then insert it on the vocal track in your DAW.
- Choose a starting chain from PRESETS. First Take is a restrained starting point; Glass Lead adds a brighter pop treatment. Loading a factory chain resets the parameter set, so choose it before making detailed edits.
- If you are recording through the plugin, select TRACK after loading the preset. Use MIX when you want access to the Natural tuning path.
- Open DESIGN and select TUNE. Choose the song's key and scale, or leave Chromatic if you want all semitones available. Check the note keyboard before judging the correction.
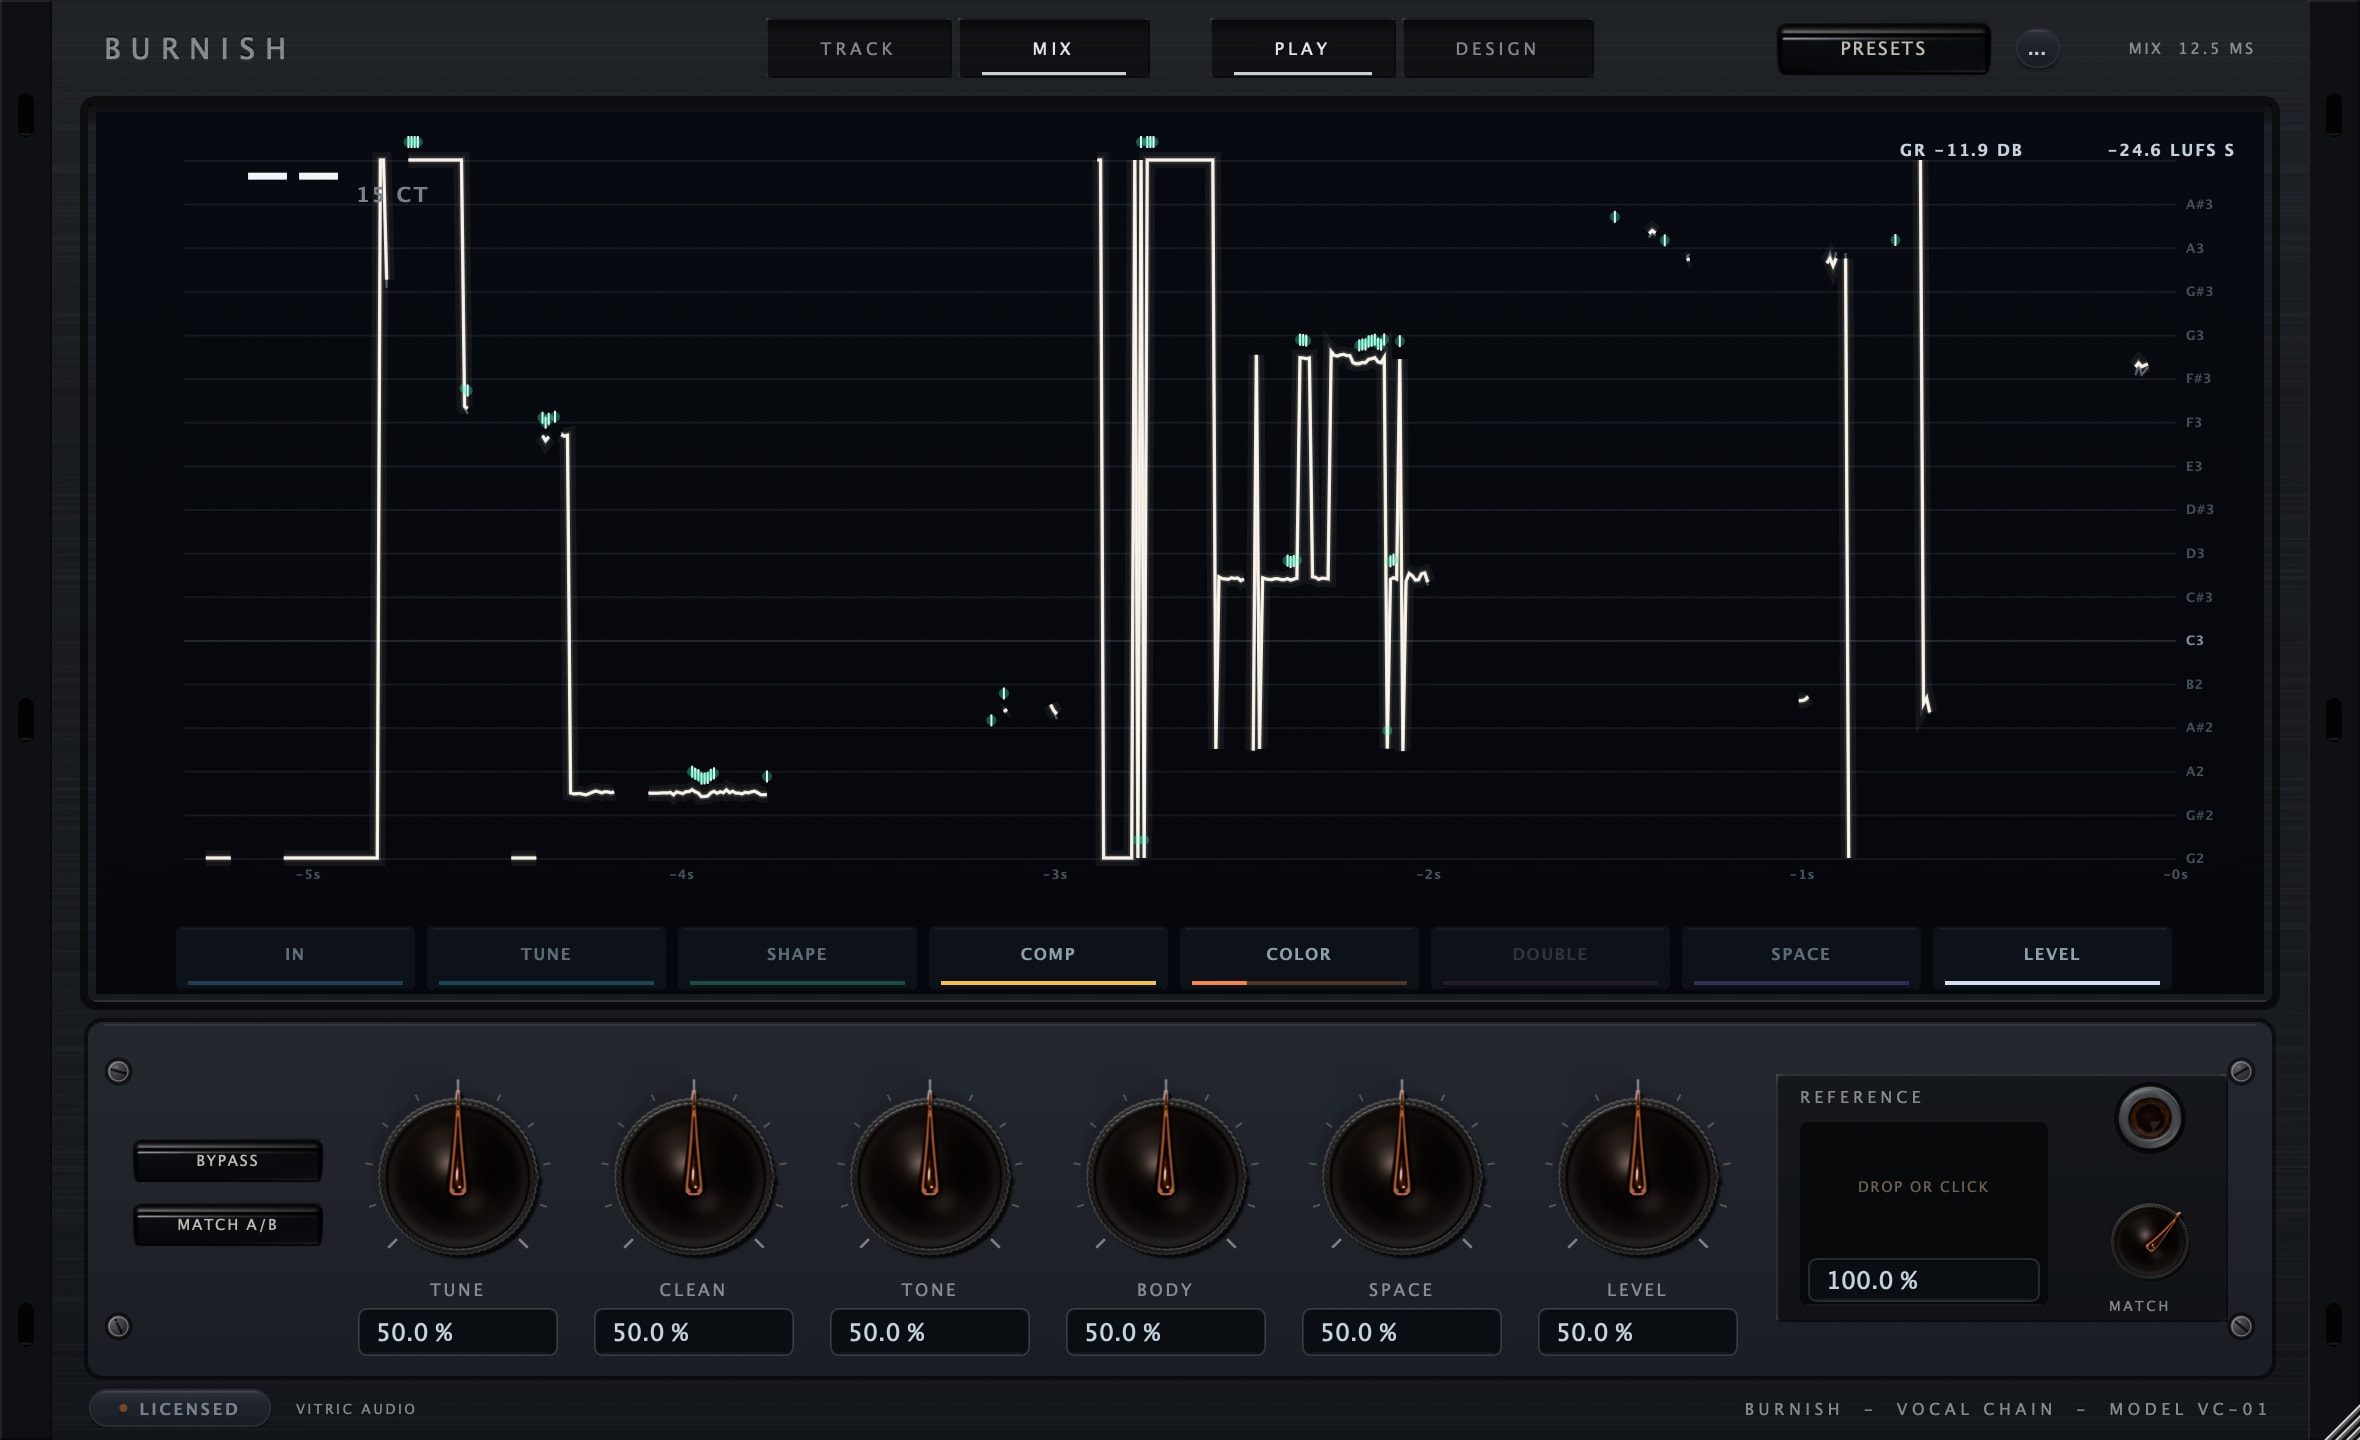
- Return to PLAY. Start with the six macros at their center positions. Adjust TUNE for correction strength, CLEAN for de-harsh and de-ess intensity, BODY for compressor amount and saturation drive, and SPACE for the delay and reverb blend.
- Listen in the mix. Use MATCH A/B to compare the processed vocal with a level-matched dry signal, then check the output level before moving on.
These are starting moves, not a required chain for every voice. Turn off individual processors you do not need.
Installation and activation
Get the current Burnish Vocal Chain installer for your computer. Save your session and close your DAW, run the Windows .exe or macOS .pkg, then reopen the DAW. Rescan plugins if necessary.
Insert Burnish Vocal Chain on an audio track or bus. Use AU in Logic Pro, AAX in Pro Tools, or VST3 in a compatible host. AU is available on macOS; both platforms include VST3 and AAX.
Windows builds require Windows 10 or later, 64-bit. Mac builds require macOS 10.15 or later on Intel, or macOS 11 or later on Apple Silicon. Your DAW may require a newer operating system.
Start a three-day trial
- Open the plugin’s license panel and choose Start free trial. This opens the trial page for Burnish Vocal Chain with your product and machine code filled in.
- Sign in using the link sent to your email. Check the product and machine code, then choose Email my trial.
- Save the attached license file from your email. On the same computer, choose Load file in the plugin’s license panel.
Install first: the three days begin when the trial license is issued. Every feature is available during that window. Keep the computer connected for periodic internet verification. There is one trial per product, person and machine, with no payment details or automatic charge. At expiry, processing locks while the plugin keeps its saved project settings.
Activate a full perpetual license
Paste the VT-... key from your purchase email or account into the license panel and choose Apply license. Full perpetual licenses work offline after activation.
For an offline studio computer, use the license portal on an online device. Enter your key and the studio computer’s VTM1-... machine code, download the bound file, transfer it to the studio computer and choose Load file. The portal can also resend your active full-license keys.
A full license allows three machine bindings over its lifetime. Deactivation does not restore a binding because permanent offline files cannot be remotely erased. Contact support for a legitimate hardware replacement after using the allowance. A trial is bound to its issuing computer.
Find the plugin after installation
Open the plugin from your DAW’s plugin browser. Check that its supported format was installed, restart the DAW, and inspect its rescan or failed-plugin list if the plugin is missing. The Mac package installs plugins, not a standalone application. Windows may also offer a standalone app under C:\Program Files\Vitric Audio.
Standard installation folders
| Format | macOS | Windows |
|---|---|---|
| AU | /Library/Audio/Plug-Ins/Components | Not available |
| VST3 | /Library/Audio/Plug-Ins/VST3 | C:\Program Files\Common Files\VST3 |
| AAX | /Library/Application Support/Avid/Audio/Plug-Ins | C:\Program Files\Common Files\Avid\Audio\Plug-Ins |
If installation or activation still fails, send support the product version, operating system, DAW version, plugin format and exact error.
PLAY, DESIGN and exact values
PLAY keeps the same six macro controls visible. Their center positions are neutral relative to the stored chain settings. Moving a macro changes the effective intensity without rewriting those underlying settings.
| PLAY control | What it changes in version 1.1.0 |
|---|---|
| TUNE | Pitch-correction amount. |
| CLEAN | De-harsh and de-ess amounts in SHAPE. Breath and floor controls remain separate in IN. |
| TONE | Enabled EQ bands' gains and Air amount. |
| BODY | Automatic compressor amounts and saturation drive. Manual compressor settings remain governed by their manual controls. |
| SPACE | Delay and reverb mix together. |
| LEVEL | The rider's allowed gain range, rather than its target or output trim. |
DESIGN changes the deck knobs to the selected station's controls. Their labels change with the selection; an unused knob is dimmed. Additional controls live on the screen. SHAPE has a page for each EQ band, COMP has FET and OPTO pages, and SPACE has delay and reverb pages.
Click a deck value or a continuous screen value to type an exact setting. Enter commits and Escape cancels. Use the displayed units, such as Hz, kHz, dB, milliseconds or percent. Invalid and out-of-range entries leave the parameter unchanged. Switching stations, pages or views cancels an unfinished entry.
STORED means a value is saved but is not driving the current mode. For example, free delay time is stored while a synchronized division is selected. Compressor manual values remain stored while automatic control is active. An AUTO readout shows a value derived by the automatic controls.
Follow the signal through the eight stations
The order is fixed: IN → TUNE → SHAPE → COMP → COLOR → DOUBLE → SPACE → LEVEL. Cleanup lives in IN and SHAPE; there is no separate CLEAN station on the rail.
IN: prepare the signal
Input Gain runs from −24 to +24 dB. The high-pass filter covers 20–400 Hz. Raise it only as far as the vocal allows without losing useful body.
The gate has a threshold, maximum attenuation range and release time. A limited range can lower noise between phrases without making every gap silent. Breath controls set how much breath reduction is applied and how readily it engages. CLEAN and FLOOR control the additional cleanup processor. These switches are independent.
The gate adds 5 ms of lookahead when it is enabled in MIX. TRACK removes that gate lookahead.
TUNE: choose the notes before the sound
Classic provides the faster correction path and suits a deliberate tuning effect. Natural uses a different pitch-shifting path with separate Throat control. TRACK forces Classic even when Natural is stored as the selected path.
KEY and SCALE establish the target notes. Available scales are Chromatic, Major, Minor, Harmonic Minor, Dorian, Mixolydian, Major Pentatonic and Minor Pentatonic. The note keyboard lets you enable or exclude individual note targets.
AMOUNT controls correction strength. Higher SPEED moves toward faster retuning; HUMANIZE relaxes the correction around the note target. THROAT changes formant character in the Natural path. If a phrase moves to the wrong note, check the key, scale and enabled notes before increasing Amount.
SHAPE: EQ, de-harsh and de-ess
Five EQ bands feed the de-harsh processor, followed by the de-esser. Each EQ band has its own enable, frequency, gain and Q. Bands 1 and 5 can be Shelf, Bell or Cut; the middle bands are bells. Frequency covers 20 Hz–20 kHz, gain is ±15 dB and Q is 0.3–10.
DE-HARSH reduces changing resonant excess and has separate Amount and Speed controls. DE-ESS reduces the high band above the selected DE FREQ, adjustable from 3–12 kHz. LISTEN solos that processed high band; it is not a removed-signal audition. Turn LISTEN off when judging the full vocal.
If an EQ gain control seems inactive, open its band page and check ENGAGE. Turning a disabled band's gain does not enable it.
COMP: FET into Opto
The FET compressor runs first, followed by Opto. Each has its own enable, Amount, Speed and parallel Blend. Start by using FET to control the sharper peaks, then adjust Opto for broader leveling.
MANUAL selects threshold, ratio, knee, attack and release controls for that compressor. Automatic Amount and Speed controls become dormant in manual operation. Both compressors also provide a sidechain high-pass frequency, which changes what drives compression rather than high-passing the audible vocal.
COLOR: character and air
Choose Tape, Tube or Present for the saturation character, then adjust DRIVE, TONE and MIX. Air has a separate enable, amount and frequency, covering 8–16 kHz. Recheck sibilance after adding air or saturation; the de-esser occurs earlier in the fixed chain.
DOUBLE: spread the lead
Enable two or four additional voices and set their detune, time spread, formant spread, width and level. Detune covers 0–50 cents and time spread covers 0–40 ms. Start with a low double level and check the vocal in mono as well as stereo.
SPACE: delay and reverb
Delay provides fixed 80 ms and 120 ms slaps, eighth-note, dotted-eighth, quarter-note and half-note divisions, plus Free time from 30–1200 ms. Feedback, Tone, Ping Pong, Mix and Duck shape the repeats.
Reverb offers Booth, Plate, Room, Hall, Chamber and Air. Set decay from 0.3–8 seconds, pre-delay from 0–200 ms, then Tone, Width, Mix and Duck. Duck lowers the wet effect while the vocal is active, allowing more of the tail between phrases. Delay and reverb have separate enables.
LEVEL: ride, limit and trim
The rider adjusts gain toward a target from −30 to −12 LUFS. SPEED controls its response, while RANGE limits how far it can move, up to 12 dB. The following limiter has a ceiling from −6 to 0 dB. OUT provides final trim.
Use the rider for phrase-level consistency and the limiter for peak control. The rider target is an internal vocal-chain setting, not a recommendation for your finished mix's delivery loudness.
Import a reference and understand MATCH
Drop a reference onto the REFERENCE dock, click the tray, or press O to browse. The dock accepts WAV, AIFF, FLAC and MP3 files. Analysis runs locally. It applies settings when a valid profile is ready and shows a reference card explaining the tonal, dynamics, sibilance, space and tuning decisions.
An isolated vocal is easier to interpret than a full mix. Full mixes use a vocal-isolation step and are identified with reduced confidence. Judge the resulting space and tone in your own arrangement.
The MATCH amount, from 0–150%, controls how strongly the fitting process follows the reference. Changing it runs the fit again and can replace detailed parameter edits. Set MATCH first, then finish the chain by ear. It is not a wet/dry knob, and setting it to zero is not an undo operation for a previous fit.
MATCH A/B is a different control: it auditions dry audio with its level matched toward the processed signal. BYPASS provides the ordinary dry comparison. Neither is a pair of user-editable preset snapshots.
Check the reference card's ACAPELLA or MIX ISOLATED label to see how the imported file was analyzed. The confidence readout describes the analysis; it does not guarantee that one recording will sound identical to another.
Presets and saving your work
The factory library has 66 chains, including 12 Learn entries, grouped by style. Learn 05 The Snap, Learn 08 The De-Ess, Learn 09 The Two Comps and Learn 11 The Space provide focused examples of those processors. They are starting configurations; inspect the enabled controls when isolating a particular effect.
Loading a factory preset resets all parameters to their defaults and then applies that chain. This includes mode, key, macros and utility settings. Recheck TRACK/MIX and tuning after changing presets. Save your own settings in the DAW's project or plugin-preset system.
Modes, shortcuts and troubleshooting
TRACK forces Classic tuning and removes gate lookahead. With the Classic path, the plugin's fixed latency is four samples, approximately 0.08 ms at 48 kHz. Natural tuning in MIX uses approximately 12.5 ms; an enabled gate adds 5 ms. Read the header for the current total. Audio-interface buffers and other plugins add to monitoring latency.
| Key or gesture | Action |
|---|---|
| V / T | Switch PLAY–DESIGN / TRACK–MIX. |
| 1–8 | Select a station, opening DESIGN if necessary. |
| B / M | Toggle BYPASS / MATCH A/B. |
| [ / ] | Previous / next factory preset. |
| O / ? | Browse for a reference / show keyboard shortcuts. |
| Shift-drag | Adjust a knob more finely. |
| Double-click a knob | Reset to that parameter's default. |
| Click a value | Type an exact setting. |
With the note keyboard focused, Left/Right selects a note and Space/Enter toggles it. Global letter shortcuts are suspended while you are typing a value. OPTIONS includes tooltips, keyboard shortcuts and Reduce visual effects.
The station rail's double-click toggles its primary processor: TUNE, de-harsh, FET, saturation, doubles, reverb or rider. IN has no rail bypass. To disable everything in SHAPE, COMP, COLOR, SPACE or LEVEL, use each processor's enable controls; a dimmed rail key does not mean every processor in that station is off.
If processing seems missing, check the license status, BYPASS, MATCH A/B and the relevant enable switch. If the whole vocal sounds unusually thin, turn off DE-ESS LISTEN. If a control appears to have no effect, check for a STORED label or an inactive processor. For help, send the product version, operating system, DAW version, plugin format and steps to reproduce through Support.