Chamfer De-Esser: the manual
Install and activate Chamfer 0.2.0, learn the detection band, adjust sibilance, choose a style and use its event display, stereo modes and presets.
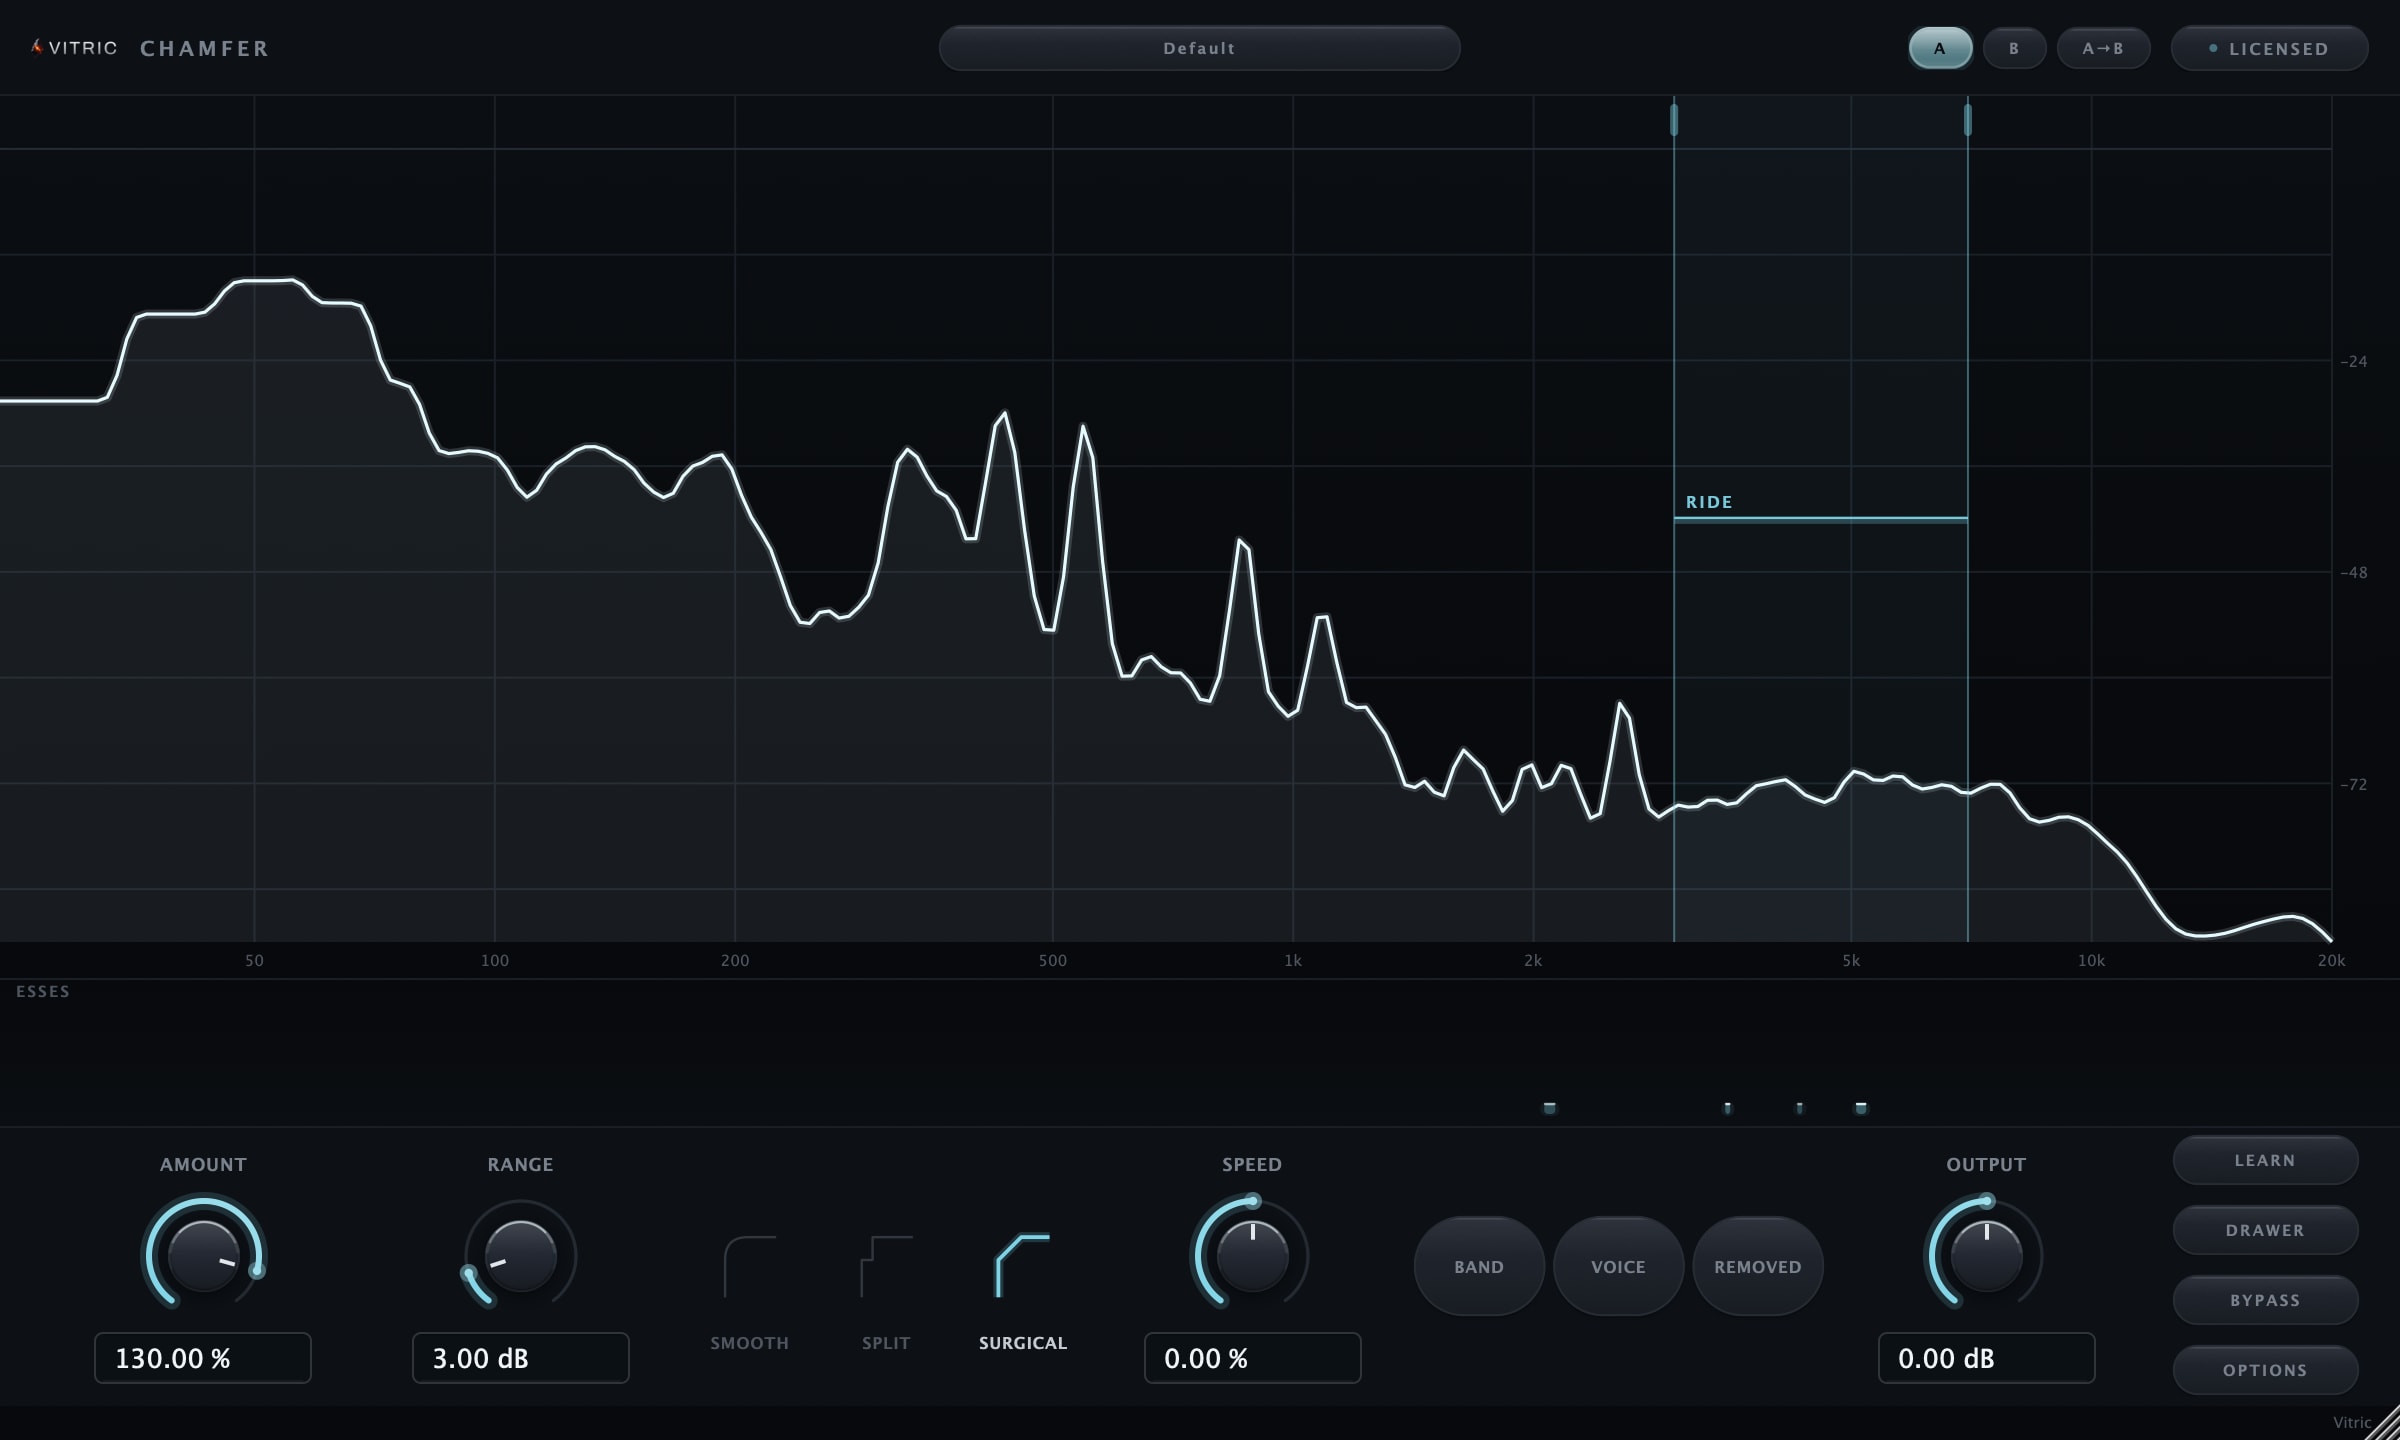
Chamfer De-Esser reduces sibilant events with a threshold that can follow the performance level. Its detection band, moving RIDE line and event strip help you see what triggers processing while you listen.
This guide covers version 0.2.0. Chamfer supports mono input and output, mono input with stereo output, and stereo input and output. Its factory starting points cover vocals, speech, cymbals, strings and buses.
Start with Learn, then adjust Amount
- Install Chamfer from Downloads, then insert it on the track you want to process.
- Play a representative phrase through it for several seconds. Include a few obvious “s”, “sh” or similarly sharp sounds, rather than silence or sustained vowels alone.
- Press LEARN. Chamfer analyzes recent input, sets the detection band, calibrates the relative threshold and suggests an Amount. If it shows LEARN?, play a phrase with more audible sibilance and try again; an unsuccessful Learn leaves the settings unchanged.
- Adjust AMOUNT while listening to the whole phrase. Use RANGE to limit the maximum reduction. The default Range is 6 dB; a smaller cap can be useful when you want gentler control.
- Briefly audition REMOVED to hear the difference signal. Return LISTEN to Off before comparing the full track with BYPASS.
For recording through the plugin, open DRAWER and choose LIVE. Select Split or Smooth, then check the sound again; Live uses a different reduction path from Precise.
Installation and activation
Get the current Chamfer De-Esser installer for your computer. Save your session and close your DAW, run the Windows .exe or macOS .pkg, then reopen the DAW. Rescan plugins if necessary.
Insert Chamfer De-Esser on an audio track or bus. Use AU in Logic Pro, AAX in Pro Tools, or VST3 in a compatible host. AU is available on macOS; both platforms include VST3 and AAX.
Windows builds require Windows 10 or later, 64-bit. Mac builds require macOS 10.15 or later on Intel, or macOS 11 or later on Apple Silicon. Your DAW may require a newer operating system.
Start a three-day trial
- Open the plugin’s license panel and choose Start free trial. This opens the trial page for Chamfer De-Esser with your product and machine code filled in.
- Sign in using the link sent to your email. Check the product and machine code, then choose Email my trial.
- Save the attached license file from your email. On the same computer, choose Load file in the plugin’s license panel.
Install first: the three days begin when the trial license is issued. Every feature is available during that window. Keep the computer connected for periodic internet verification. There is one trial per product, person and machine, with no payment details or automatic charge. At expiry, processing locks while the plugin keeps its saved project settings.
Activate a full perpetual license
Paste the VT-... key from your purchase email or account into the license panel and choose Apply license. Full perpetual licenses work offline after activation.
For an offline studio computer, use the license portal on an online device. Enter your key and the studio computer’s VTM1-... machine code, download the bound file, transfer it to the studio computer and choose Load file. The portal can also resend your active full-license keys.
A full license allows three machine bindings over its lifetime. Deactivation does not restore a binding because permanent offline files cannot be remotely erased. Contact support for a legitimate hardware replacement after using the allowance. A trial is bound to its issuing computer.
Find the plugin after installation
Open the plugin from your DAW’s plugin browser. Check that its supported format was installed, restart the DAW, and inspect its rescan or failed-plugin list if the plugin is missing. The Mac package installs plugins, not a standalone application. Windows may also offer a standalone app under C:\Program Files\Vitric Audio.
Standard installation folders
| Format | macOS | Windows |
|---|---|---|
| AU | /Library/Audio/Plug-Ins/Components | Not available |
| VST3 | /Library/Audio/Plug-Ins/VST3 | C:\Program Files\Common Files\VST3 |
| AAX | /Library/Application Support/Avid/Audio/Plug-Ins | C:\Program Files\Common Files\Avid\Audio\Plug-Ins |
If installation or activation still fails, send support the product version, operating system, DAW version, plugin format and exact error.
Understand the processing order
Chamfer analyzes the selected detection source, compares the chosen frequency band with the surrounding signal and calculates how much reduction the event needs. The threshold mode, learned calibration, sensitivity, Amount and Range influence that request. The selected style shapes the reduction, and the result reaches OUTPUT trim. LISTEN can replace the normal output with a diagnostic signal; BYPASS provides a level-matched dry comparison.
Relative threshold follows the performance. Absolute threshold instead uses a fixed operating level. Amount sets the target balance, while Range caps the depth: these controls solve different problems.
Read and position the detection band
The translucent pane on the analyzer marks the working band. Drag an edge to change one boundary, or drag inside the pane to move both boundaries while keeping its width. Scroll over the band to widen or narrow it around its center. Hold Shift for fine adjustment.
Click the band to expose LOW EDGE and HIGH EDGE values, then type in Hz or kHz. Enter commits; Escape cancels. The low edge's parameter range is 1–16 kHz and the high edge's is 2–20 kHz, with each limited by the other edge so the band stays valid. The default band is 4.5–10 kHz. Double-click an edge to reset that boundary, or double-click the pane to reset both.
The RIDE line shows the current threshold. Crossing it contributes to detection; the detector also considers the signal's characteristics, so crossing alone does not guarantee a reduction event. Move the band by listening to the troublesome sounds, rather than covering every visible high-frequency peak.
Main controls
| Control | Range and behavior |
|---|---|
| AMOUNT | 0–150%, default 100%. Moves the target ess-to-body balance. Above 100% asks for a softer ess balance; below 25% it also fades processing toward off. |
| RANGE | 0–24 dB, default 6 dB. Caps the requested reduction. Lower it when the strongest events sound overprocessed. |
| STYLE | Smooth, Split or Surgical. Shapes where the reduction is applied. |
| SPEED | −50 to +50%, default 0%. Positive values speed the envelope up; negative values slow it down. |
| OUTPUT | −12 to +12 dB, default 0. Final level adjustment. |
| BYPASS | Switches to a latency-aligned dry comparison with running level matching. |
Choose a style
Smooth spreads the attenuation into a gradual high-frequency contour. Try it when a whole bright region needs easing, such as a backing-vocal bus or cymbal wash. Its Live implementation uses a high shelf beginning at the band's low edge.
Split reduces the selected band more uniformly. Try it for a conventional de-essing treatment or when you want to hear the effect of moving the boundaries clearly.
Surgical varies reduction across the spectrum of the event. It is the default in Precise. In Live, Surgical runs as Split; choose Precise when you need the Surgical spectral path.
These descriptions explain the available shapes, not which one is automatically right for a particular voice. Compare the whole phrase after changing style.
Use the Listen controls
| Listen mode | What reaches the output |
|---|---|
| Band | The input within the selected band. Useful for positioning the detector. |
| Voice | The input outside the selected band. It is a frequency-band audition, not vocal isolation. |
| Removed | The difference between latency-aligned dry and processed audio. Useful for hearing what the current processing changes. |
Click a Listen chip to latch it, or press and hold with the mouse for a momentary audition. Keyboard 1, 2 and 3 latch Band, Voice and Removed; pressing the same key again returns to Off. Holding those keys does not provide momentary listening.
Do not mix while accidentally leaving a Listen mode engaged. If the output suddenly sounds like only hiss, only low frequencies or a quiet difference signal, check LISTEN first.
Open the drawer for source-specific settings
| Drawer control | What it does |
|---|---|
| THRESHOLD | Relative follows the program level and learned calibration. Absolute uses a fixed threshold. |
| OFFSET | −12 to +12 dB. Positive values raise the threshold and make triggering harder; negative values lower it. It applies in both threshold modes. |
| ABS THR | −60 to 0 dBFS. The fixed threshold used in Absolute mode, with Offset added. It remains stored while Relative is active. |
| LATENCY | Precise uses the spectral reduction path. Live uses a causal path with zero reported plugin latency. |
| DETECT | Stereo detects from the mid signal and processes both channels. Mid Focus processes the mid component; Sides processes the side component. |
| LINK | 0–100%. In Precise, Stereo, Split/Surgical operation, lower values let each channel's band energy bias its reduction depth. At 100%, both channels use the shared shape. |
| SENSE | 0–100%, default 50%. Higher values make the detector more permissive; lower values demand stronger evidence. |
| ATTACK / RELEASE | Independent −50 to +50% envelope trims. Positive trims lengthen that part of the envelope; negative trims shorten it, on top of SPEED. |
LINK does not change the Smooth path, Live processing or Mid Focus/Sides routing in 0.2.0. It does not create two independent detectors. Sides needs a stereo difference signal; a mono source has no side component to process.
In Precise, the reported latency is 191 samples, approximately 3.98 ms at 48 kHz. The sample count is fixed, so the time changes with sample rate. Live reports zero plugin latency. Your audio interface, DAW buffer and other plugins still contribute to monitoring delay.
Inspect an event
The ess strip records detected events. Height indicates commanded depth; brightness represents detector confidence. Click an event to open its card with time, commanded reduction, confidence and a center-frequency marker.
In supported Precise configurations, the card also shows a LINKED MODEL: a retained detector spectrum with the linked reduction gains applied. It helps explain the processing decision but is not a separately recorded per-channel before/after measurement. Live events, unlinked-channel cases and expired captures display why their spectra are unavailable.
Commanded depth is not a loudness reading of the entire vocal. Listen to the word in context and compare BYPASS when deciding whether the result is better. Click the card or press Escape to dismiss it.
A/B snapshots and presets
A and B hold two parameter snapshots. Use the arrow to copy the current settings to the other slot, adjust one version, then switch between them. Both slots and the selected slot save with the project. Learn's source calibration is shared across A and B, so running Learn is not an independent calibration experiment in each slot.
The 24 factory presets are grouped by source. Close Pop Lead, Dark Male VO, Fast Rap, Hi-Hat Tamer, Acoustic Sparkle and Live Stage Vocal are useful starting labels, not source restrictions. A vocal with different recording balance may need a different band or less Amount than the preset suggests.
Factory presets set the sound controls and their intended latency and stereo modes. They reset threshold mode to Relative, Offset to zero, and Attack/Release trims to zero. They preserve Listen, Bypass and Output, so check those utility controls after loading a preset. Save personal settings using your DAW's project or plugin-preset system.
Practical adjustments
A bright lead still spits on a few words. Audition Band and check that those consonants fall inside it. Return Listen to Off, then increase Amount or lower Offset slightly. If reduction keeps reaching Range, decide by ear whether to allow a larger cap.
The vocal loses too much articulation. Lower Amount or Range, check whether the band includes useful presence, and compare another style. The reduction safeguards do not replace listening to the result on your material.
A backing-vocal bus sounds sharp at the edges. Start with BV Blend or Wide Stack Sides. Sides leaves the mid component untreated, so use that mode only when the problem is actually in the stereo difference signal.
Learn does nothing. Play audio through the instance first. Learn needs at least two seconds of captured audio and enough confident sibilant frames; a longer phrase with several esses is more useful than a long vowel. LEARN? means it declined to change the setup.
Keyboard, exact values and help
| Key or gesture | Action |
|---|---|
| 1 / 2 / 3 | Latch Band / Voice / Removed; repeat to turn off. |
| L / D / B | Learn / show or hide Drawer / toggle Bypass. |
| ? | Open keyboard shortcuts. |
| Escape | Close the active inspection, drawer or shortcut surface; cancel a value edit while typing. |
| Shift-drag | Fine adjustment. |
| Double-click a knob | Reset to the parameter default. |
| Arrow keys on a focused control | Nudge its value. |
| Click a numeric readout | Type an exact value; Enter commits and Escape cancels. |
OPTIONS contains the tooltip switch and shortcut sheet. Letter shortcuts are suspended during text entry. For help, include the product version, operating system, DAW version, plugin format, and the settings that reproduce the problem through Support.